Stefan Cameron on Forms
Building intelligent forms using Adobe LiveCycle Designer

'Form Fragments' Category Archive

Fragment Library File Management

Did you know that the Fragment Library palette in LiveCycle Designer 8.2 now lets you edit fragment titles and descriptions, even fragment files themselves, without having to first open the files that contain them?

Prior to Designer 8.2 it was possible to see the title and description associated with a fragment by selecting the “Fragment Info” command from a fragment listed in the Fragment Library palette. This dialog, however, didn’t let you edit that metadata unless you were actually editing the file (XDP) that contained the fragment at the same time. That is, in order to edit a fragment’s title and description, you would have to edit it Designer first, then change its information.

Note that the Fragment Library palette is only available when using Designer outside of Workbench.

As of Designer 8.2, you can that directly from the Fragment Info dialog without having to open the file that contains it and you can even delete a fragment. The Fragment Library palette will even handle the case where there are multiple fragments in the same file (e.g. you have an XDP that contains a single paragraph of text translated into multiple languages, each being a fragment that can be referenced individually by a localized form) when you decide to delete an existing fragment.

Editing Title and Description

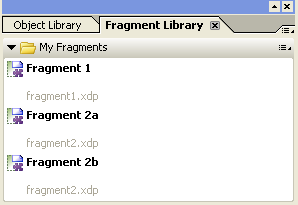
Say you have 3 fragments: Fragment_1, Fragment_2a and Fragment_2b. Fragment_1 is in fragment1.xdp and the other two are in fragment2.xdp and both files are in the same folder, “My Fragments”. They would look like this in the Fragment Library palette:

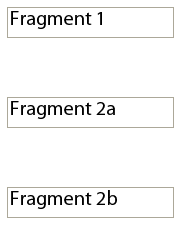
In the form that references them, they would look like this:

Without any of the fragment files being opened in Designer, you can edit the description of Fragment_2a to be “My description.” and see the new description appear immediately in the Fragment Library palette:


—Editing the description.


—New description in the Fragment Library palette after clicking “OK” in the Fragment Info dialog.

You can do the same for the title.

Deleting Fragments

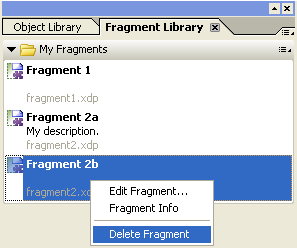
Now say you wanted to delete Fragment_2b. Instead of having to open fragment2.xdp, select the Fragment_2b subform, delete it and then save your changes, you can just right-click on the “Fragment 2b” item in the Fragment Library palette and choose the “Delete Fragment” command.

You will be presented with a confirmation dialog stating that deleting the fragment will cause broken fragment references in all forms that might be using it. You can opt not to have this dialog displayed again.

If you choose to proceed, the fragment is removed from the file that contained it (fragment2.xdp in this case) and references in currently-open forms are updated:


—Result of deleting Fragment_2b when our form was still referencing it (it was replaced with a broken fragment reference).

Additionally, if there are no longer any fragments defined in the file which contained the fragment you just deleted, you’ll get another prompt asking if you would like to also delete the file that contained the fragment (which you can also opt not to be displayed in the future). If you accept, the file that contained the fragment would also be deleted. For example, if you opted to always remove the fragment and always remove an empty fragment file and deleted Fragment_1 from Fragment Library palette, the fragment and its file would be deleted instantly and all references would be updated, showing broken fragment references in its place.


Posted by Stefan Cameron on January 26th, 2009
Filed under Designer,Form Fragments,Tutorials

Tab Order Revamped

Back when I announced that Designer 8.2 and Acrobat 9 had shipped, I mentioned that there had been a “major tab ordering UI update”. The Team knew that something had to be done to address all the issues you had been experiencing (it follows that it was the most requested feature on my Designer 8.2 Featur-O-meter) and I think they really delivered!

Make it so

I think one of the most significant improvements to the functionality is that what you set in Designer is what you get in Acrobat. In the past, given certain circumstances, the order you set in Designer was not necessarily the order you would get in Acrobat. Designer 8.2 and Acrobat/Reader 9, together, fix that issue.

For example, this view shows the new Tab Order palette where tab order is set to “Automatic” which means the order depends largely on the visual placement of fields on the form, from left to right and top to bottom:

In this next view, I’ve simply moved the City field below the Country field. As you can see in the tab order list, City is now last in tab order simply because it’s positioned below the Country field (and it’s also highlighted in the list because I have it selected on the canvas):

Tab Order palette

The Tab Order palette is how you work with tab order in Designer 8.2. While there is still a “tab order mode”, you no longer (attempt to) set the order by entering tab order mode and clicking on fields on the canvas in the order you want tab order to be set. Instead, you do everything from the palette (sequence numbers are still displayed over the fields and you can still click on them to select their corresponding item in the tab order list within the Tab Order palette but the order itself is no longer set by clicking on the canvas).

Before we go any further, there’s some extra visual aids for tab order which you’ll want to turn-on (if anything, they’re really cool). In the “Tools menu > Options command > Tab Order tab”, set the “Display Additional Visual Aids for Tab Order” setting:

Now select the Tab Order palette (“Window menu > Tab Order command”) and you’ll automatically be entered into “tab order mode” (if not, click on the “Show Order” button on the palette):

Once this is done, set the order to “Custom” so that you can set the order you want.

To get a feel for what the order is (now that you’ve enabled the “additional visual aids”), you can simply mouse-over the fields on the canvas:

(In the above screen shot, my mouse is hovering over the City field.)

Setting the order

Using the object list in the Tab Order palette, the order can be set in many different ways:

  • drag and drop the items in the list
  • multi-select items in the list and drag & drop them
  • make a selection and use the arrow buttons to move them around
  • select one item and hit the F2 key to manually set its sequence number
  • make a selection (either with the mouse or the keyboard) and change the order by holding the Control key while using the up/down arrow keys
  • cut and paste a selection using the items in the palette menu

Form Fragments

The Tab Order feature also handles form fragments gracefully and treats them as “white blocks”. Following my address block example, if you make a fragment out of the City, State and Zip fields, that object is now treated as a single object. The tab order can’t be changed from the reference to the fragment (i.e. the tab order of the fields inside the fragment can’t be changed from the form that references the fragment) but it can be changed around it:

In order to change the tab order inside the fragment, you’ll need to edit the tab order in the fragment itself.

Text Objects

Finally, the revamped Tab Order feature is also capable of handling text objects. This comes in handy especially when you have a hyperlink somewhere in a text object and you want to control where, in the tabbing sequence, that focus jumps to the hyperlink and where it goes to afterward.

In order to set the tab order of a text object, you must uncheck the “Tools > Options > Tab Order > Only Show Tab Order for Fields” option in the Tab Order Properties Dialog (checked in the linked screenshot: you must uncheck it).

After applying the above setting, the Tab Order Palette will show all form objects, not just fields.

Apr 3, 2010 — Added “Text Objects” section


Posted by Stefan Cameron on September 22nd, 2008
Filed under Acrobat,Bugs,Designer,Form Fragments,Tutorials

Form Fragment Video Tutorial

That’s right: I’ve officially made my video tutorial debut. Just posted to the LiveCycle Developer Center is a video I recorded with the help of my colleague Zee over at FlexLive.net and Adobe Captivate.

In this instructional video, I demonstrate how to use the new Form Fragments feature in LC Designer ES to make it easier to re-use pieces (“fragments”) of various forms. This technique should help you create forms that are more maintainable than ever before.

Let me know what you think!


Posted by Stefan Cameron on July 16th, 2007
Filed under Form Fragments,Tutorials