Designer Environment Initial Setup
While I was attending MAX 2009 a couple of weeks ago, I mentioned setting-up a keyboard shortcut for showing/hiding the Script Editor palette to one of my colleagues who thought it was the greatest thing since sliced bread! (OK, maybe not that great but it was obvious this would be a great time-saver). Since this is part of what I do whenever I install a new version of Designer, I thought others may find it useful to know all of what I do to get my form development environment setup just right, maximizing design canvas real estate and making it as easy as possible to edit scripts. The following steps are based on Designer ES2 however most should apply to older versions as well:
- Click “don’t show again” on welcome screen; click ‘exit’.
- Maximize the Designer window on your largest monitor — mine is a 24in monitor with 1920×1200 resolution.
- Drag the Script Editor (SE), initially displayed in single-line mode at the top of the window, out over the Designer window so it’s floating in multi-line mode. Hold the [Ctrl] key down while positioning the palette so that it doesn’t dock to any side. Make the palette almost as big as the Designer window but not so wide as to hide palettes on left hand side where the Hierarchy palette is located.

- Hide/close the SE by clicking on the tiny “x” at the top right hand side of the palette.
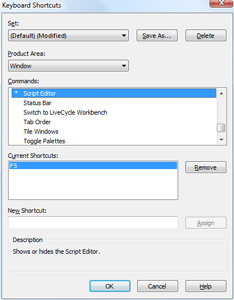
- “Tools menu > Keyboard Shortcuts“; choose “Window” from “Product Area” drop down; scroll almost to the end of the command list that appears/filters below and select “Script Editor”; click the “Remove” button to remove the current [Ctrl+Shift+F5] shortcut; put your cursor in the “New Shortcut” field and press “F5”; press the “Assign” button — you’ll get a warning that F5 is already assigned to “PDF Preview” — choose “Yes” to re-assign it to the SE palette.
- Optional: Set the keyboard shortcut for “PDF Preview” (under the “View” product area) to “Ctrl + F5”. I tend to always click on the “PDF Preview” tab to preview so I usually don’t bother with setting-up this shortcut.
- Set “Tools menu > Options > Doc Handling > Default File Type for New Forms” to “Dynamic XML Form” — part of ensuring your forms preview as Dynamic PDFs.
- Set “Tools menu > Options > Workspace > Script Editor > Show Line Numbers” to checked.
- Set “Tools menu > Options > Workspace > XML Source > Show Line Numbers” to checked.
- Set “Tools menu > Options > Data Binding > Show Dynamic Properties” to checked.
- Set “Tools menu > Options > Data Binding > Subform Binding > Default Binding for New Subforms” to “None” or “No Data Binding” — this prevents data binding errors when adding new subforms to control layout and forces you to think of the data binding when adding subforms for data structure.
- Set “Tools menu > Options > Tab Order > Display Additional Visual Aids for Tab Order” to checked — ’cause it’s really cool!
- If using Designer prior to version ES2/9.0 (where toolbar customization was removed), right-click on a toolbar, choose “Customize”, then un-check “Large Buttons” to reduce the screen real estate consumed by the large toolbar buttons. It’s not much but a few pixels here and there add-up to a lot of savings.
- Choose “Window menu > Font” to show the Font and Paragraph palettes docked together in a floating window in the center of the app window; dock the palette to the left hand side with the Hierarchy, PDF Structure, Data View and Tab Order palette group above; click on the Paragraph tab to activate the palette and force it to resize to its “normal” height (it’s taller than the Font palette and doing this now means it won’t shift the next time you switch back and forth between the two palettes).
- Hide the “How To” palette — this leaves the Object Library on the top half of the right side and the Object/Accessibility palettes on the bottom half.
- Right-click on the Object palette’s tab: you’ll get a drop down menu containing the names of other palettes within that group that aren’t visible: Layout and Border. Select Layout, then Border to show those palettes within the group.
- Click on the “New” button in the toolbar (not the drop down arrow next to it, the button part) — this gives you a new document using the default document template (letter size). Drag a text field onto the form; check that the Paragraph palette on the bottom left side and Object palette on the bottom right side don’t have “expansion handles” visible, indicating that the palette UI isn’t entirely visible
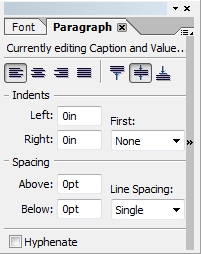
Partially-visible Paragraph palette
Partially-visible Object paletteIf they are visible, click on them to make the palettes wide enough to display all of the UI, then reduce the width of the left/right dock area by clicking and dragging on the edge between the palettes and the form area until the “expansion handles” appear, then drag back out just until they disappear — this ensures the left and right dock areas are just wide enough to display all palette UI but no wider than necessary so that your form design canvas real estate is maximized. You can also play with the width so that it’s just a little larger, making the Object Library Standard objects display in two columns rather than a single, long column which you may have to scroll in order to get to objects you want to use.
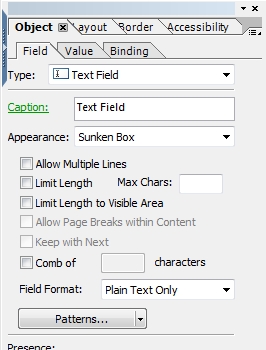
Fully-visible Object palette after performing steps above - Right-click on the “Design View” tab to see a context menu of hidden form canvas area views: Master Pages and XML Source. Choose “Master Pages” then “XML Source” to show the tabs. Go back to “Design View”.
- Close the new form you created (most likely, there’s no need to save changes).
- Choose “File menu > Open”, set the file type to “Adobe LiveCycle Designer Templates (*.tds)” and open
c:\Users\<username>\AppData\Roaming\Adobe\Designer\<version>\<lang(EN)>\Templates\Blank\Letter.tds(the location will vary depending on the version of Windows you are using). This is the default template used to create new documents, as set in the Template Manager by default.
- With the Letter.tds template open, choose “File menu > Form Properties > Defaults”; set “Target Version > Choose version…” to the latest available version, “Acrobat/Reader 9.1”; set “Scripting > Default Language” to “JavaScript” (thought in v9 this can now be set in “Tools menu > Options > Workspace > Script Editor > Default Language for New Forms”); (optional) set “Scripting > Default Run At” to “Client and Server” (to make sure your code runs when rendering on the server to PDF/A, for example, if this is a frequent requirement); set “Scripting > Preserve scripting changes to form when saved” to “Manually” (it’s a good habit to take care of it yourself so you don’t get into a snag with certified forms); set “Scripting > Enforce Strict Scoping Rules in JavaScript” to checked (only possible if target version is 8.1 or later and helps you write more robust scripts); set “Server > PDF Render Format” to “Dynamic XML Form” (again, to ensure your PDFs are dynamic, this time for server renderings). Ensure that “Preview > Preview Type” is set to “Interactive Form” and “Preview > Preview Adobe XML Form As” is set to “Dynamic XML Form” — makes sure that your forms are previewed as Dynamic PDFs rather than Static PDFs, even when previewing an XDP, although this still won’t help you if you if you save your form as a Static PDF.
- Switch to the XML Source view and search (Ctrl+F) for “originalXFAVersion”. If found, remove the processing instruction to ensure that you are truly creating the latest and greatest type of XFA document (as you specified in “File menu > Form Properties Defaults > Target Version”) when you create a new form from the default template. Remove the following (or similar) processing instruction (PI), if found:
<?originalXFAVersion http://www.xfa.org/schema/xfa-template/2.8/?>Click on “Design View” and apply your changes to the source.
- Save your changes to the Letter.tds template. Repeat steps 20 to 22 for any other templates you use regularly.
- Click on the “New” button in the toolbar (not the drop down, the actual button to the left hand side of it). Verify that your “Form Properties” settings are applied to the new form and that the originalXFAVersion PI is not in the source (the one you may have removed from the template’s source in step 22).
Posted by Stefan Cameron on October 30th, 2009
Filed under Designer
Both comments and pings are currently closed.
