Shading the caption, not the entire field
Have you ever wanted to shade (color) a field’s caption instead of its content area? For example, you may want

instead of (entire field shaded)

or (field’s content area shaded)

Shading the entire field is easy: just set the background fill color using the Border palette. Shading the field’s content area is easy too: just choose “Object palette > Field tab > Appearance > Custom…” and set the background color in the Custom Appearance dialog that appears. Shading the caption, that’s not so trivial, unfortunately.
There are actually six (six!) steps involved in shading a field’s caption if you want the end-result to be a field that has a shaded caption but retains all of the original spacing (i.e. margins) of the caption’s text and the field’s value (don’t worry, it only seems long because I explain the logic of the steps along the way):
- Set the field’s background color to blue (or whatever color you want the caption to be): “Border palette > Background Fill > Style > Solid” and use the color well to choose the color you want.
- Set the field’s content area background color to white (the “paper”/document color): “Object palette > Field tab > Appearance > Custom… > Background Fill > Style > Solid” and use the color well to set the color to white.
- Remove all field margins but remember what they were — we’ll need them in the following steps (this gets rid of the color you see above, below and to the right of the field’s content area): “Layout palette > Margins” and set all of them to zero.
- Set the field caption’s indentation and spacing paragraph formatting properties to the original margins: “Paragraph palette > Edit Caption Properties” using the edit menu as follows:
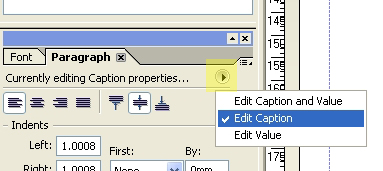
This will ensure that you’re only modifying the caption’s paragraph formatting properties (the default is set to modifying both the caption and value, or “content area”, at the same time). The set the “Indents > Left”, “Indents > Right”, “Spacing > Above” and “Spacing Below” to the original left, right, top and bottom margins, respectively. This will give the illusion of margins around the caption without actually setting the margins so that the field’s background color we set in step 1 won’t be visible around the field’s content area.
- Set the field’s content area (value) indentation and spacing paragraph formatting properties to the original margins except for the left spacing otherwise the spacing between the caption and content area (value) will be doubled because we’ve already set the caption’s right spacing to the original right margin: “Paragraph palette > Edit Value Properties” using the edit menu as above. The set the “Indents > Right”, “Spacing > Above” and “Spacing > Below” to the original right, top and bottom margins, respectively. Ensure that “Indents > Left” is set to zero. This will give the content area the illusion of having margins without actually setting margins on the field. (Note that this may conflict with paragraph formatting you may want on a multi-lined text field, for example. If that’s the case, you simply may not be able to give the effect of the original margins on the content area.)
- Add the original left margin value to the field caption’s reserve (the space reserved within the field’s “box” for displaying the caption): “Layout palette > Caption > Reserve” and add the left margin value to the value currently set in the Reserve property. This will move the content area back to its original horizontal position prior to removing the margins.
So there you have it: a shaded caption! Now that you’ve done these steps, all you need to do to change the shade is change the field’s background color (like in step 1).
Remember that you can always store a field you’ve formatted this way as a custom object in the Object Library so that you can easily re-use it again in other forms without having to go through these steps again.
To illustrate this a little better, I’ve included a sample form that shows the various ways to shade a field:
Minimum Requirements: I created this form using Designer 8.1.1 SP2 and Acrobat 8.1.2 however this technique should work at least back to Designer 7.1 and Acrobat 7.0.5.
Posted by Stefan Cameron on June 13th, 2008
Filed under Designer,Tutorials