Shading the caption, not the entire field
Have you ever wanted to shade (color) a field’s caption instead of its content area? For example, you may want

instead of (entire field shaded)

or (field’s content area shaded)

Shading the entire field is easy: just set the background fill color using the Border palette. Shading the field’s content area is easy too: just choose “Object palette > Field tab > Appearance > Custom…” and set the background color in the Custom Appearance dialog that appears. Shading the caption, that’s not so trivial, unfortunately.
There are actually six (six!) steps involved in shading a field’s caption if you want the end-result to be a field that has a shaded caption but retains all of the original spacing (i.e. margins) of the caption’s text and the field’s value (don’t worry, it only seems long because I explain the logic of the steps along the way):
- Set the field’s background color to blue (or whatever color you want the caption to be): “Border palette > Background Fill > Style > Solid” and use the color well to choose the color you want.
- Set the field’s content area background color to white (the “paper”/document color): “Object palette > Field tab > Appearance > Custom… > Background Fill > Style > Solid” and use the color well to set the color to white.
- Remove all field margins but remember what they were — we’ll need them in the following steps (this gets rid of the color you see above, below and to the right of the field’s content area): “Layout palette > Margins” and set all of them to zero.
- Set the field caption’s indentation and spacing paragraph formatting properties to the original margins: “Paragraph palette > Edit Caption Properties” using the edit menu as follows:
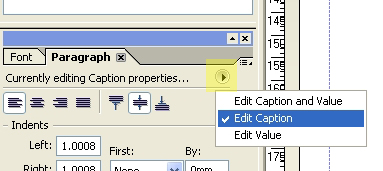
This will ensure that you’re only modifying the caption’s paragraph formatting properties (the default is set to modifying both the caption and value, or “content area”, at the same time). The set the “Indents > Left”, “Indents > Right”, “Spacing > Above” and “Spacing Below” to the original left, right, top and bottom margins, respectively. This will give the illusion of margins around the caption without actually setting the margins so that the field’s background color we set in step 1 won’t be visible around the field’s content area.
- Set the field’s content area (value) indentation and spacing paragraph formatting properties to the original margins except for the left spacing otherwise the spacing between the caption and content area (value) will be doubled because we’ve already set the caption’s right spacing to the original right margin: “Paragraph palette > Edit Value Properties” using the edit menu as above. The set the “Indents > Right”, “Spacing > Above” and “Spacing > Below” to the original right, top and bottom margins, respectively. Ensure that “Indents > Left” is set to zero. This will give the content area the illusion of having margins without actually setting margins on the field. (Note that this may conflict with paragraph formatting you may want on a multi-lined text field, for example. If that’s the case, you simply may not be able to give the effect of the original margins on the content area.)
- Add the original left margin value to the field caption’s reserve (the space reserved within the field’s “box” for displaying the caption): “Layout palette > Caption > Reserve” and add the left margin value to the value currently set in the Reserve property. This will move the content area back to its original horizontal position prior to removing the margins.
So there you have it: a shaded caption! Now that you’ve done these steps, all you need to do to change the shade is change the field’s background color (like in step 1).
Remember that you can always store a field you’ve formatted this way as a custom object in the Object Library so that you can easily re-use it again in other forms without having to go through these steps again.
To illustrate this a little better, I’ve included a sample form that shows the various ways to shade a field:
Minimum Requirements: I created this form using Designer 8.1.1 SP2 and Acrobat 8.1.2 however this technique should work at least back to Designer 7.1 and Acrobat 7.0.5.
Posted by Stefan Cameron on June 13th, 2008
Filed under Designer,Tutorials
Both comments and pings are currently closed.

If we have a backend of SQL and talk to it via ASP.net, but we wanted to use the livecycle suite to have clients fill out PDF forms which when completed would trigger emails sent to various sources with various information from the froms, how would you suggest we proceed?
Rick,
I would suggest you build an ASP.net web service that provides a way for the form to post data. You would then connect your form to this web service and when data gets posted to the web service after the form is completed, you can then use ASP.net to send the various pieces of data to the email addresses. Note that your web service methods would have to be doc/literal. For this solution, you would only need Acrobat Standard or Pro on every client desktop and Designer to create the form. If your clients have Reader on their machines, then you would have to extend the form for data import/export capabilities using LiveCycle Reader Extensions.
Stefan,
What if the data is HIGHLY confidential (subject to litigation if it were leaked) ? Would you still recommend the web service? If so, how do you secure it?
Dear Stefan,
I’m a secretary (without any IT/programmer training), but always need to fill in government’s form in Acrobat form format for my clients. Ususally are surname, given name, address, working status … etc, approx 30-50 fields.
However, sometime I make typo being filling too much fields. As I had created my client’s database in MS Access and can you teach me how to link/convert my MS Access database to Acrobat Adobe Form? Or any software you can sugget me to us?
Thanks
Timmy
Rick,
You should be able to connect to a web service running over HTTPS rather than plain (exposed) HTTP however I certainly cannot give you any guarantees as to how secure this solution would be. If you want to be sure, I suggest you contact Adobe Support.
T. Kwong,
It sounds like what you want to do is connect your form to your Access database. Once you figure-out how to do that, you might want to include a drop down list of client names in your form from which you can choose the client for whom you’re filling-out the form. When you select the client’s name, all their information (presumably stored in your database) would be pre-loaded into those fields you normally have to fill by hand.
Note that you’ll need Acrobat Standard or Pro to import data into your form from your database and, should you want others to be able to do the same, each system will need Acrobat Standard/Pro as well as a configured DSN to connect to the database (which will need to be accessible from all systems concerned).
I have a working PDF form that was created in Adobe and Designer (Livecycle). I need to add (import) 5 pages from another PDF into the form. I can import while in Adobe Profesional and the new pages display fine, including all the form fields, button, etc.. Howver when I switch back to Designer to add fileds to the newly added pages, they are missing. I open the form back up in Adobe Professional and they are there ??? Any thoughts? Why can’t I sse the new pages in Designer?
Sorry Stefan, I posted to the wrong area.
Eric Horde,
This is likely due to the fact that you’re editing an XFA-PDF form using Acrobat. An XFA-PDF form can’t be edited in Acrobat in the same way a normal PDF can be (adding/removing pages, etc.). I think you would need to start by importing the pages from the PDF into an XFA form in Designer and then copy/paste the result into your original form.
Stefan,
Thanks for your brilliant articles, but mostly this one, http://blogs.adobe.com/formbuilder/2006/09/connecting_form_to_database.html
I have taken your method and tried to adapt it to my needs, just to display an autonumber field from a simple access database I created. Not trying to change any records, just display the last entry in an autonumber field. I used the sql statement “Select last(JobNumbers) from JobWorkNumbers”
Strange behavior, if I open the pdf in the reader, its displaying the 2nd to last record, and if I open it with acrobat it displays the last entry as I planned. You do say that I will get errors if I push data into this database, because of the autonumber field, but I thought just reading from it would be ok. Any suggestions?
Never mind, I guess I posted in the wrong place to start with, and also seem to have found the problem. I replaced the drive letter in the connection string with a unc address, and switched my sql statement to “select MAX()” instead of “select LAST()”
Either way, these articles are a GODSEND, and thanks again, and again, and again…….
M. Murphy,
I’m glad you found what the problem was and it’s always nice to hear that my articles are useful! Thanks!