Stefan Cameron on Forms
Building intelligent forms using Adobe LiveCycle Designer

Archive for September, 2006

Selecting Specific Database Records

Every now and then, someone posts a comment with a question on how to do something and the answer requires more than just a quick response. In this case, it was Ricardo’s question on how to select a specific record from a data connection to a database for editing in a form.

If you read my previous post on Connecting a Form to a Database, you might’ve realized that the result was a single live data connection to the entire set of records in a database. This is great if you want to iterate through all records one at a time and update them on an individual basis. You might’ve also realized that you could narrow the scope of the data connection by specifying a more specific SQL statement (with a WHERE clause, for example). But what if you wanted the form to filter, on the spot, the data loaded from the data connection? For example, you might want to let the user pick from the different movie categories (action, comedy or drama) and then let them iterate through only that subset of the Movie Database.

If you’ve been scratching your elbow, pinching your nose and blinking your eyes in hopes that this might “just work”, well, it’s actually scratch your nose, pinch your elbow and roll your eyes — ok, just kidding…

The idea with this sample (based on the Movie Database) is to design a form which has a drop down list for picking a movie category and then a subform (which appears only once a category has been selected) that contains the movie data for all movies with the selected category.

The key to achieving this functionality is to use two data connections. (It’s important to note here that while you may only have a single data connection which loads data from an XML Data file, you may have any number of data connections to web services (WSDL) and databases (ODBC).) Furthermore, the use of SQL statement is crucial to making this work properly.

xfa.sourceSet.{DataConnectionName}

When you define a data connection in the Data View palette, you’re actually defining a <source name=”{DataConnectionName}”> node within the <sourceSet> packet inside the XDP file (which is then wrapped in a PDF if you save your form as a PDF file). Since this is defined in the XDP using XML, you can access its properties just like you can get at the properties of the objects you place on your form.

In this sample, I’ve defined two data connections to the Movie Database:
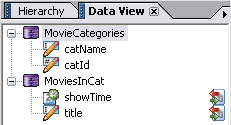
Two Data Connections

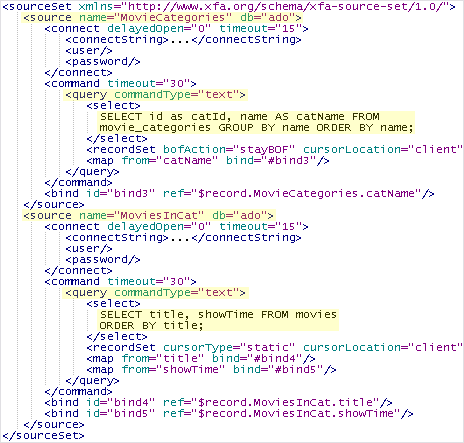
If you look at the XML Source which describes these connections, you can see that there’s an interesting command node which contains information about the query currently being used by each data connection. That’s what we ultimately want to modify once the user picks a movie category:
Source Set XML

//query@commandType

You should note that the query node’s commandType attribute value is very important. Setting it to text will let you specify the SQL statement used by the data connection. Other possible values are table (to let you specify a table name for the data connection) and storedProc for specifying a stored procedure.

Data Node Names

Another very important thing to note is the names given to the data nodes in the MovieCategories data connection. You’ll notice that the following SQL statement is used for the data connection:

SELECT id as catId, name AS catName FROM movie_categories
GROUP BY name ORDER BY name;

In particular, the id and name columns have been renamed to catId and catName, respectively. That’s because having data nodes with the names “id” and “name” in your data connection will give you a lot of headaches when attempting to iterate through the xfa.record.{DataConnectionName} node in order to find the data associated to the current record from a data connection (so that we can display the category names in the drop down list, for example). This is because the words “id” and “name” conflict with properties of the xfa.record object.

Building the Form

Category List

The first step is to use the Data Drop Down List object from the Custom tab in the Library palette. This is a really handy object that has code in its Initialize event that’s already setup to populate its item list based on data nodes from a data connection.

In the Initialize event of the object, set the data connection name to “MovieCategories”, the hidden value column name to “catId” and the display text column name to “catName”.

If you run the form at this point, you should get three values in the list: “Action”, “Comedy” and “Drama”.

Movies in the Category

Next, create a subform (let’s call it “movieData”) which contains fields with explicit bindings to the title and showTime data nodes from the MoviesInCat data connection using the Binding tab in the Object palette. Also, add the Data Connection Controls object from the Connecting a Form to a Database sample to this subform (making the proper adjustments for the data connection name in each button’s Click event script) and make this subform invisible.

At this point, you should have a form which displays a list of categories and contains an invisible subform.

Filtering Records Displayed by the movieData Subform

Finally, in the Data Drop Down List’s Change event, write a script which sets the SQL statement used by the MoviesInCat data connection, opens the connection and displays the movieData subform. For this sample, I chose to use FormCalc to script this event.

First, get the category selected by the user and determine it’s associated ID:

var sCategoryName = xfa.event.newText
var sCategoryId = $.boundItem(sCategoryName)

Given the XML structure of the <sourceSet> packet displayed above, you first set the query’s command type to “text”:

xfa.sourceSet.MoviesInCat.#command.query.commandType = "text"

This ensures that the data connection will use an SQL statement. Note the pound (#) prefix to the command property of the MoviesInCat node.

Then, set the SQL statement, on the MoviesInCat data connection, which will filter the records from the movie table in order to show only those that belong to the selected category:

xfa.sourceSet.MoviesInCat.#command.query.select =
  concat("SELECT title, showTime FROM movies WHERE categoryId = ",
    sCategoryId, " ORDER BY title;")

Finally, open the data connection, move to the first record and show the invisible subform:

xfa.sourceSet.MoviesInCat.open()
xfa.sourceSet.MoviesInCat.first()
movieData.presence = "visible"

Opening the data connection will cause the explicit bindings you set earlier on the fields in the movieData subform pertaining to the movie title and show time data to be used in order to load data from the xfa.record.MoviesInCat record (which will now contain the data from the first record of the MoviesInCat data connection as per the SQL statement we just built using the selected category ID).

If you want to “run” this sample, you can download the form and Movie Database here:

Download Sample [zip]

Minimum Requirements: Designer 7.0, Acrobat Standard 7.0.

Use the FormBuilderDB20060929.sql file to build the database, create an ODBC Connection named “FormBuilderDB” and load the form.

Update for Designer/Acrobat 8.0 forms: If you’re attempting to reproduce this sample or something similar in your own forms using Designer and Acrobat 8.0, you’ll most likely run into security errors when attempting to run the form in Acrobat 8.0. This is due to new restrictions imposed on modifying data connections at run time in XFA 2.5 forms.

Updated: February 6, 2007


Posted by Stefan Cameron on September 29th, 2006
Filed under Data Binding,Scripting,Tutorials
Getting a List's New Selection

Have you ever struggled to figure-out what item from a list (list box or drop down list) a user had just selected in the list’s Change event? If so, it’s possible you were trying to use the

rawValue

property in order to get at this information.

Unlike other objects such as exclusion groups, the rawValue property of a list object doesn’t reflect the new selection until the selected value is committed to it (by the user tabbing or clicking away from the list). That means that if you’re trying to, say, make a certain field visible at the moment when a particular item in the list is selected, you can’t use the rawValue property because it still contains the old (previous selection) value.

Instead, you must use the

xfa.event.newText

object/property of the Change event itself and possibly the list object’s

boundItem

function in order to determine the value associated with the new selection.

When scripting any XFA event, you always have access to properties (information) of that event via the

xfa.event

object. In the case of the Change event (which occurs when the list’s selection changes), the

xfa.event.newText

property is of particular interest because it contains the text portion of the item that was just selected in the list. It’s important to note that this is only the text portion because if your list contains items with values that differ from their text (you’ve associated both a text and value part to each item in the list), you’re probably even more interested in determine the value associated with the new text that was just selected in the list. Fortunately, that’s an easy problem to solve as well:

this.boundItem( xfa.event.newText ); // JavaScript
$.boundItem( xfa.event.newText ) // FormCalc

will return the value bound (associated) to the text from the list’s new selection.

So there you have it: When handling a list object’s (list boxes or drop down lists) Change event, don’t rely on the rawValue to get the new selection: Use xfa.event.newText and boundItem(text) instead.


Posted by Stefan Cameron on September 23rd, 2006
Filed under Events,Scripting

Designer Training at MAX

Mike Potter will be giving a training session on LiveCycle Designer at Adobe MAX 2006 next month.

As he prepares for his session, I’d like to give you an opportunity to influence what he’ll talk about so that his session is as valuable to you as possible:

  • Are there specific features you’d like to see a demo for? Dynamic Subforms? Conditional Breaks? Data-Nominated Subforms? Data Binding?
  • Should he talk about form design methods like why and when to use repeating (dynamic) subforms, how to validate your form prior to submission, etc.?
  • Anything else?

Posted by Stefan Cameron on September 20th, 2006
Filed under Conferences,MAX 2006

Connecting a Form to a Database

In response to Lala and malik’s questions on connecting a form to a database (whether it’s Microsoft Access, MySQL, etc. doesn’t really matter), I decided to write a little tutorial on how to do it.

Even if you already know how to do it, I encourage you to pay special attention to the section on Auto-Incremented Table Columns because it might help you understand and resolve some of the issues you may have already run into.

Create a System DSN

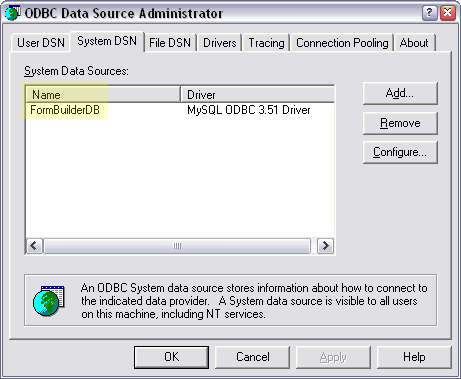
First, you need to create a System DSN for your database using the ODBC Data Source Administrator Windows tool.

ODBC Data Source Administrator

That will let Acrobat interface with your database when your form is opened in Acrobat in order to be read and/or filled. Because of the DSN, it doesn’t matter what kind of database you need to connect to.

For this tutorial, I’ll be using my FormBuilder database which contains the same kind of movie information found in the XML Data files from various other tutorials I’ve already posted:

Download Movie Database [sql]

This SQL file will create the database and a user if you’re using something like MySQL (for which you can also download a free ODBC driver). You should also be able to easily tweak it to create tables in a Microsoft Access database if that’s what you want to use.

Make a New Data Connection

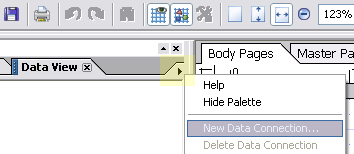
The second thing you need to do is create a data connection in Designer: From a new or existing form, open the Data View palette (you can use the “Window | Data View” menu item to open it) and choose “New Data Connection” from the palette’s fly-out menu.

Data View Palette Fly-Out Menu

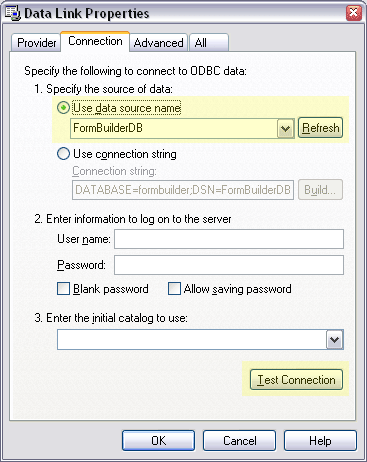
In the “New Data Connection” wizard, pick “OLEDB Database” from the first screen, using the “Build” button on the next screen to open the “Data Link Properties” dialog, go to the “Connection” tab and pick the name of the DSN you created in the first step from the first drop down list. Then click the “Test Connection” button to make sure a connection can be established to the database via the DSN.

Data Link Properties Dialog

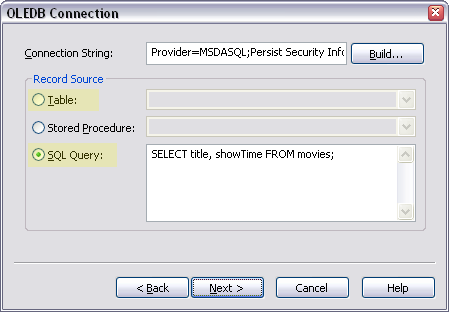
Click on OK to close the “Data Link Properties” dialog and return to the “New Data Connection” wizard. Now that you’ve chosen a DSN, you’ll be able to specify the resource within that DSN to which the connection should be made: You may either pick a Table from the list, specify a Stored Procedure or specify an SQL Query. If you’re connecting to a single table, you may be able to simply pick its name from the list of tables. If you need to connect to multiple tables in the same data connection, then you’ll need to use a Stored Procedure or an SQL Query.

Table Or SQL Query

Auto-Incremented Table Columns

If the table you’re wanting to connect to contains any auto-incrementing columns, you must use the “SQL Query” option instead of simply choosing a table name from the “Table” option. If you pick a table with an auto-increment column, you’ll be able to read from it but you’ll get errors when you try to push data into it. If this is the case, write an SQL Query that selects all columns in the table except for those which are auto-incremented. In the image above, I chose “SQL Query” because the “movie” table I’m connecting to has an auto-incrementing column named “id” that needs to be excluded from the data connection.

Bind Fields to Data Connection Nodes

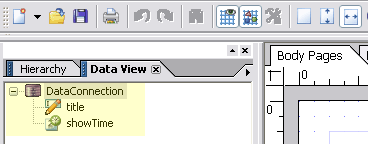
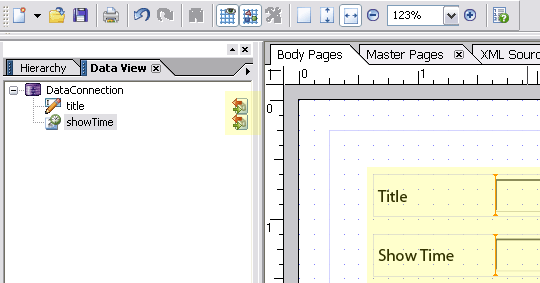
At this point, you should have a new data connection listed in the Data View palette which contains a list of “nodes”, one for each column in the table(s) you picked while setting-up the data connection:

Data Connection in Data View Palette

The next step is to create fields to represent each node in the data connection and bind each field to its respective data node. The easiest way to do this is simply to drag & drop the nodes from the data connection onto your form. This is handy for two important reasons:

  1. The Data View palette has inspected the definition of each node and pre-determined the best type of field to use in order to edit its data.
  2. When you drop the nodes onto the form, the fields that are created are automatically setup to be bound to their respective data nodes.

The database I’ve connected to is one that uses the Movie Data I’ve used in previous tutorials. In this case, I’ve connected to the Movie table’s “title” and “showTime” columns. Since the “title” column is described as VARCHAR, the Data View palette figured it should be a text field. As for the “showTime” column, described as TIME, it’s set to be a date/time field with its Data Format property preset to Time.

After you’ve completed this step, the Data View palette now shows the data nodes in the data connection as “bound” with special icons:

Fields Bound to Data Nodes

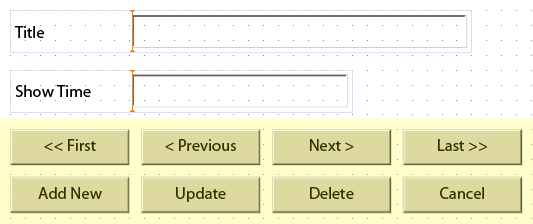
Add Control Buttons

The last step in this process consists in adding a set of controls to manipulate the records in the database obtained via the data connection. The simplest way to do this is to use a set of buttons where each is assigned one of the following statements (each statement is one line and provided in FormCalc):

xfa.sourceSet.{DataConnectionName}.first()
xfa.sourceSet.{DataConnectionName}.previous()
xfa.sourceSet.{DataConnectionName}.next()
xfa.sourceSet.{DataConnectionName}.last()
xfa.sourceSet.{DataConnectionName}.addNew()
xfa.sourceSet.{DataConnectionName}.update()
xfa.sourceSet.{DataConnectionName}.delete()
xfa.sourceSet.{DataConnectionName}.cancel()

where {DataConnectionName} should be replaced by the name you gave to the data connection you created earlier (“DataConnection” by default).

Each statement above represents a different action to take with the data connection: Move to the first, previous, next or last record, add a new record, update or delete the current record and cancel changes to the current record, respectively.

Data Connection Control Buttons

Note that the “first”, “previous”, “next” and “last” statements imply an “update” by default which means that if you simply use

xfa.sourceSet.{DataConnectionName}.next()

to move to the next record and the user has made changes to the current record, those changes will be committed prior to moving to the next record. If you want those navigation controls not to commit changes (and therefore require the user to explicitly click on the “update” button in order to apply any changes to the current record), you must specify the cancel statement prior to the next statement:

xfa.souceSet.{DataConnectionName}.cancel()
xfa.souceSet.{DataConnectionName}.next()

To help you do this quicker now and in the future, here’s a Library Object Snippet that you can place into the Custom tab of the Library palette (you’ll have to save the XFO file to the following folder on your system: C:\Documents and Settings\{userid}\Application Data\Adobe\Designer\en\objects\custom where userid is your windows user id).

Download Data Connection Controls Snippet [xfo]

Minimum Requirements: Designer 7.0, Acrobat 7.0.

Once you place the file in the folder indicated above, you’ll then have a new object in the Custom tab of your Library palette named “DataConnectionControls”. Simply drag the object onto your form and the buttons will appear, all pre-configured and ready to go.

Run Your Form

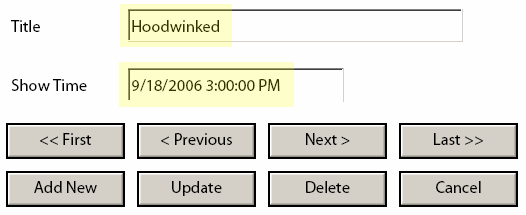
Now that the DSN, data connection, fields, bindings and navigation controls have been setup, you should be able to preview your form in Acrobat Pro and see the first record in the database table(s) pre-loaded into the bound fields.

Form Loaded In Acrobat

If you’re having problems getting this going, you can check-out my form (assuming you’ve created the FormBuilder database and a DSN for it) to see if you missed any steps:

Download Sample [pdf]

Minimum Requirements: Designer 7.0, Acrobat Standard 7.0.

Updated: October 17, 2006


Posted by Stefan Cameron on September 18th, 2006
Filed under Data Binding,Tutorials

Designer 7 Training by CYTA

I just noticed that Carl Young himself from Carl Young Training Associates is giving a new course on Designer 7 this Fall that looks very interesting (here’s the full course outline if you’re looking for details).

They’ll be in Phoenix, AZ, Nov. 13 – 14, 2006, and Houston, TX, Nov. 27 – 28, 2006.


Posted by Stefan Cameron on September 15th, 2006
Filed under Designer