Stefan Cameron on Forms
Building intelligent forms using Adobe LiveCycle Designer

'Data Binding' Category Archive

Connecting to a Web Service

Since I wrote my various articles on connecting forms to databases, I’ve had numerous inquiries about connecting to web services so here’s the long-overdue article on doing just that.

In Designer, you not only have the ability to create data connections to schemas (directly or based on sample XML data) and databases, you can also connect to web services. Web services are online applications that return information in response to specific requests. These requests and responses are sent and received via the SOAP protocol in various formats, as specified by the web service in an XML-based language called WSDL (you guessed it — Web Service Description Language).

Advantages of Web Services

One of the main advantages of using web services is to create an abstraction from server components such that clients ask the web service for information (via its various operations) without having to know the specifics about the server-side implementation (e.g. the web service may retrieve information from an Access database one day and later switch to a MySQL database but the client would still retrieve information in the same way, via the web service’s operations). If implemented correctly, web services can also provide better security by preventing clients from connecting directly to databases from the Internet, for example.

Supported Web Service Operation Types

To keep things simple, the WSDL basically describes the operations that are supported by the web service. To execute an operation, the client must submit a request to a web service operation and, upon receipt, the web service will execute the operation and submit a response back to the client, possibly containing data. Furthermore, these requests and responses are submitted in specific formats using specific data types which the WSDL also describes for each operation.

Document/Literal — Supported in Designer and Acrobat

The most important thing to note here is that Designer only supports executing web service operations which are specified as document/literal. This means that an operation defines XML schemas for its request and response formats. In turn, the XML data adhering to an operation’s request and response schemas can easily be gathered from a form using basic data bindings (a way, in XFA, to link a particular field’s value to a specific data node in a data connection).

RPC/Encoded — Supported in Acrobat only

Some of you more familiar with web services will note that operations may also be specified in the rpc/encoded format. Designer does not support executing such operations at this time because the data formats are more complex than straight XML schemas. The Google Search web service is an example. You may choose to connect to such operations using Acrobat’s SOAP object but beware that there is no server-side support for this object. This article will focus on doc/literal operations since they’re fully supported across all LiveCycle products.

Creating the Data Connection

Now that you have a basic understanding of web services and the document/literal operation type supported in Designer, let’s see how simple it is to execute a web service operation and receive a response.

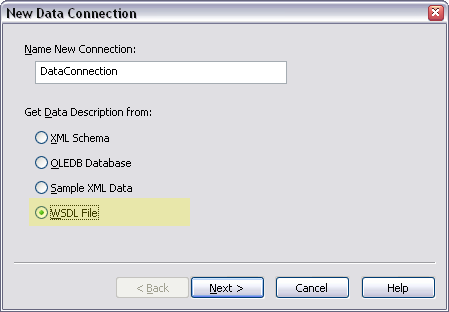
First, you must create a new data connection to a web service. In the Data View palette’s menu, choose the "New Data Connection…" command, select "WSDL File" as the type and continue to the next step:

Choose "WSDL File" as the type.

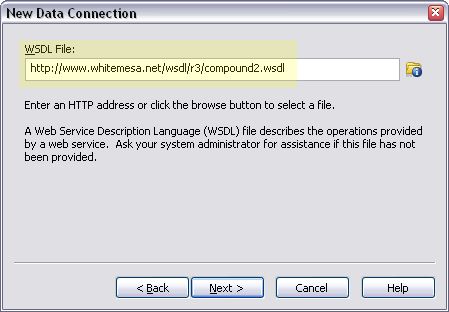
At the second step, you’ll be asked to specify the WSDL file to connect to. For this tutorial, you’ll connect to a little web service called "Echo Employee" which simply defines 4 fields for the request and returns their data back as the response:

http://www.whitemesa.net/wsdl/r3/compound2.wsdl

Specify the source WSDL file.

When you click the "next" button, Designer will attempt to connect to the WSDL file and retrieve a list of its document/literal operations. If successful, you’ll get to the third step where you can choose the operation that will be executed by the data connection:

Specify the operation to execute.

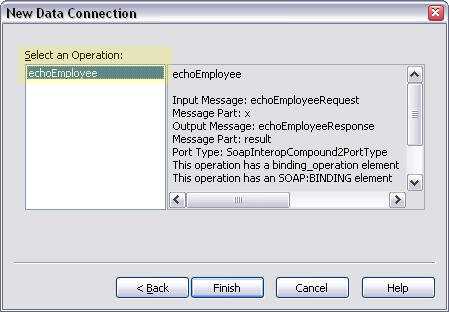
In this case, there is only one operation. Choose "echoEmpolyee" and click on the "finish" button.

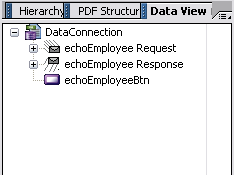
Designer will then use the data type definitions for the request and response formats of the echoEmployee operation to define a data structure in the new data connection in the Data View palette:

The new data connection in the Data View palette.

The only thing that remains is to create 2 sets of fields (one which will be used to submit the data for the request and another to receive the response) and a button to execute the operation. This can be done very easily simply by dragging and dropping the "DataConnection" node (or whatever you named your data connection earlier when you created it) onto your form. This will automatically generate all the necessary fields and bindings as well as the execute button:

New bindings after drag & drop.

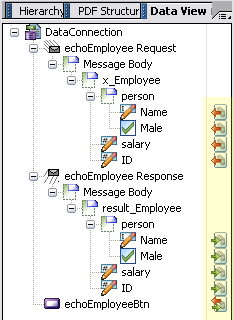
Notice, in the Data View palette, that the icons pertaining to the various request/response fields are different than the usual binding icons: The request field icons have a single red arrow pointing to the left (indicating that their data is outgoing) and the response field icons have a single green arrow pointing to the right (indicating that their data is incoming).

You should now have the following object block on your form (from the earlier drag and drop operation) with fields of types matching the data which they will contain (text, numeric, etc.):

New fields and button after drag & drop.

That’s it! All that remains is to preview your form using Acrobat Standard or Pro (since connecting to a web service implies importing data which is only possible using Acrobat Standard/Pro or an extended PDF, via LC Reader Extensions, in Reader).

In the preview window, fill-in the top 4 fields and click on the "Echo Employee Btn".

Top 4 fields filled-in in preview.

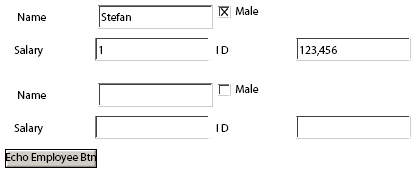
If you correctly configured your data connection and created the necessary fields and bindings, Acrobat should connect to the web service, submit the data you entered as the request to the "echoEmployee" operation which will, in turn, respond with the same data to Acrobat, at which point the response data will be pushed into the response fields (directly below the 4 top fields):

Bttom 4 fields filled-in after response in preview.

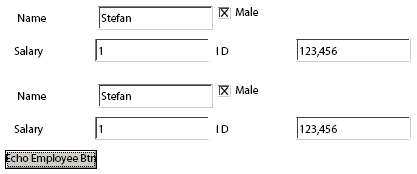
Note that the fact that the same data is returned is only specific to this web service and its "echoEmployee" operation. Other web service operations may return different data (e.g. you submit a record ID and the response contains all the information for an individual) or not data at all (if the operation is simply meant to add a new record in a back-end system, for example).

Update (May 24, 2007): Zee, a colleague at flexlive.net, has posted a video tutorial on connecting a form to a web service. If you’re looking for something with more context, you might want to try that since you get to see the actual steps in Designer which I’m attempting to describe.

Update (Sep 2, 2010): faith pointed-out that the “Echo Employee” web service I had based this tutorial’s sample on no longer works. In fact, it doesn’t seem to exist anymore. I have kept the original sample since the tutorial is based on it and I have provided a new sample PDF based on a different web service (see below).

Sample Form

In case you have trouble following these steps, you may download the "solution" file here:

Download (original) [pdf]

Download (updated Sep 2, 2010) [pdf]

Minimum Sample Requirements: Designer 7.x, Acrobat 7.x.

Sep 2, 2010 — Add new sample PDF based on different web service since original sample PDF’s web service is no longer available online.


Posted by Stefan Cameron on May 21st, 2007
Filed under Acrobat,Data Binding,Tutorials

Databases: Inserting, Updating and Deleting Records

Since all of the previous tutorials I’ve posted with regards to data connections have dealt with searching for records and displaying the results, I thought I should post a little tutorial on how to use data connections for inserting, updating and deleting records as well.

You may recall that the tutorial on connecting a form to a database did demonstrate one method of inserting, updating and deleting records from a database. The problem with using bindings to fields in order to modify records in a data connection is that you must set those fields to the values for the current record and then you have to use the data connection object scripting methods like "addNew()", "update()" or "delete()". This can get really awkward if all you’re wanting to do is insert a new record, for instance, and just doesn’t cut it if you want to avoid having to load-in data when the form is opened (the only purpose for the data connection may be such that new records can be inserted or existing ones can be deleted yet displaying existing records is not required).

This small tutorial uses a basic ODBC data connection defined in the form and then modifies it, via script, in order to be able to execute SQL statements which either insert, update or delete records from any table in the database for which the data connection was setup to work with. It then uses a separate data connection to the same database for query purposes only since there’s no sense complicating things with an all-purpose data connection — especially when it comes to running "select" SQL statements in order to iterate through records returned by the query.

Key Concept

The key concept with this tutorial is the fact that the <query> node inside an ODBC data connection (as we saw in the tutorial on selecting specific database records) can be used to execute all sorts of SQL statements — not just "select" queries. This means that if you set the <select> node (inside the <query> node) to be an "insert" SQL statement and open the data connection, the result will be a new record in the database as per the insert statement’s parameters (and the same goes for "update" and "delete" SQL statements). In fact, the XFA 2.4 Specification states, on page 772, that "despite the name [of the <query> node], this element can also be used to delete, insert, and update records."

BOF and EOF Actions

One very important thing to note is that the "Beginning of File" and "End of File" actions on the <query> node’s <recordSet> child node (which describes how records in the data connection are navigated) must be set to "stayBOF" and "stayEOF", respectively, otherwise you may run into serious problems. That is, the result of reaching the beginning or end of the record set when opening the data connection must be to "stay" where you (the record set navigator) are when the SQL statement is one or more of "insert", "update" and "delete".

See the script in the "Database" script object in the sample form for more details on how to specify this. Use the Hierarchy palette to locate it under the root subform.

Sample Form

I’ve designed a form that should put this all into perspective for you as well as give you a very useful script object which you can place in your Custom Library tab and re-use in other forms.

In short, these are the steps I followed to design this form:

  1. I created the "RunSQLDataConnection" ODBC data connection to my "FormBuilder" database, specifying a short SQL query to the new "movie_comments" table (although any other table would’ve been just fine).
  2. I created the second "ListComments" ODBC data connection to my "FormBuilder" database, specifying an SQL query that exposes the "username", "title" (movie title obtained from a join on the movie table) and "comment" columns.
  3. I inserted the various buttons and fields and wrote the scripts.

I’ve included lots of comments through the scripts to detail what’s going on at each stage as well as why certain things are being done so please have look at the sample (note that you don’t have to have the data connections setup in order to open the form and look at the script) and let me know if you have any questions.

Download Sample [pdf]

Download FormBuilder Database Definition [sql]

Minimum Requirements: Designer 8.0, Acrobat Pro/Std 8.0


Posted by Stefan Cameron on December 18th, 2006
Filed under Data Binding,Scripting,Tutorials

Better Form Design with XFA 2.5

You may have noticed that the new version of Designer and Acrobat that Adobe recently released uses a new version of XFA (2.5 to be exact). While the language has many new features in and of its own, the version of the language (2.5 vs 2.4 or older) also dictates how your forms will behave in Acrobat 8+ with respect to certification (digital signatures) and ubiquitization (Reader-enablement).

Background

Since this new behaviour, which is geared to encourage better form design going forward, will ultimately change the way you write certain scripts, I believe it’s important to start with some basic knowledge of XFA forms, see what happens when they get certified/ubiquitized, examine how each used to behave in Acrobat 7 and then how they’ll behave in Acrobat 8+.

XFA Primer

Simply said, an XFA form is described inside an XDP file. When it’s saved as a PDF file, the XDP is actually embedded into the PDF so that it can be processed by Acrobat.

If you look at the XDP (via Designer’s XML Source view), you’ll see that it’s simply a collection of packets that describe the form’s various components. For example, <template> describes the form’s layout and behaviour while <sourceSet> contains a collection of data connection descriptions you’ve defined using the Data View palette. When the form is loaded as a PDF into Acrobat, each packet is loaded into its own in-memory (temporary) model and that’s what you actually reference in your scripts. For example, you access the sourceSet packet via the sourceSet model with “xfa.sourceSet“. Changes to these models are reflected directly into their pertaining packets.

Form Certification/Ubiquitization

Without going into more details than are necessary, once a form is either certified and/or ubiquitized, modifications to any of the protected content (the various models) should be prevented. Modifying the form’s protected content post-certification/ubiquitization would invalidate the certification/ubiquitization status. Such modifications mean that the document is no longer in the state in which it was when it was digitally signed and therefore can no longer be trusted by the recipient as being authentic. Even though the modification may have been caused by authored script in the form, no distinction is made between those kinds of modifications and malicious attacks by an unknown party to, for instance, cause form data to be submitted to an alternate server.

Acrobat 7 and XFA 2.4

Acrobat 7 supported XFA forms up to XFA 2.4 (which Designer 7.1 would author). Once an XFA 2.4 form would be either certified and/or ubiquitized, Acrobat 7 would detect modifications to the form’s protected content and would invalidate its certification/ubiquitization status if such modifications occurred. It didn’t, however, prevent the sourceSet model from being modified post-certification/ubiquitization even though the <sourceSet> packet was included as part of the certification/ubiquitization process.

The inherent danger in this was that while any form that would do common things like display all the records in a database or select specific records in a database (filter records) — which required the modification of data connection nodes contained within the sourceSet model — would function happily at first, problems would ensue later on when a form’s certification/ubiquitization status would be inadvertently invalidated, for example, because of an unauthorized modification to a certified/ubiquitized model (sourceSet).

Acrobat 8 and XFA 2.4

In order to address the problem of inadvertent modifications (by form scripts) to certified/ubiquitized XFA 2.4 forms, Acrobat 8 was designed to prevent the sourceSet model (and any other certified and/or ubiquitized content) from being modified post-certification/ubiquitization. This means that if an XFA 2.4 form, loaded in Acrobat 8+, becomes certified and/or ubiquitized, any attempt by a form script to modify the sourceSet model (as in the two examples I mentioned earlier) will result in a security exception:

GeneralError: Operation failed.
XFAObject.setAttribute:25:XFA:form1[0]:initialize
This operation violates your permissions configuration.

One could argue, of course, that this change effectively “breaks” XFA 2.4 forms in Acrobat 8+ but in the end, inadvertently invalidating a form’s certification/ubiquitization status is likely just as bad as a security failure in a form’s script (because it attempted to modify a now-protected model) from a user experience point-of-view. As I mentioned earlier, Acrobat makes no distinction between authored scripts and malicious attacks when certified/ubiquitized content is modified — and neither does the user (in their minds, the content simply can’t be trusted any longer)!

Acrobat 8 and XFA 2.5

With a new version of Acrobat and XFA, there was an opportunity to further improve on the user experience of both certified/ubiquitized and non-certified/ubiquitized forms going forward. It was done simply by ensuring that modifications to any model that becomes protected post-certification/ubiquitization are now prevented from the start (whether the form is certified and/or ubiquitized or not) and by using XFA 2.5 as Acrobat 8+’s “trigger” for imposing the new behaviour.

The result is that we’re now forced to think about security from the very beginning of the form design process by opting to work with copies of the in-memory models (which is achieved by cloning models) rather than with the base models such that our forms don’t fail regardless of their certified/ubiquitized state. With XFA 2.5’s support for “on-the-fly” certification/ubiquitization, a form may become secured and locked-down at any point in its “live cycle” which makes it imperative to use scripting techniques which won’t fail post-certification/ubiquitization.

Legacy Mode

New forms authored in Designer 8.0 will be XFA 2.5 forms by default and you’ll need to use the new cloning technique described later in this article. That being said, if you need things to be back the way they were, there is a way that you can still use Designer 8.0 to design XFA 2.4 forms and that’s by using what’s called the Legacy Mode processing instruction.

Put simply, switch to the XML Source view for an XFA 2.5 form in Designer 8.0 and insert the following processing instruction under the <template> node (as a child element):

<?originalXFAVersion http://www.xfa.org/schema/xfa-template/2.4/?>

The result will be that Acrobat 8.0 will run your form as though it was an XFA 2.4 form — but be aware that this will also prevent you from using any of the new language extensions and APIs that come with XFA 2.5 (more on those in later posts).

(By the way, when you load an older form — earlier than XFA 2.5 — into Designer 8.0, even though the form’s version is upgraded to XFA 2.5, the Legacy Mode processing instruction specifying the form’s original XFA version is automatically added so that your form continues to work properly with respect to the XFA version is was originally designed for.)

Modifying sourceSet in XFA 2.5+ Forms

In order to avoid unexpected security exceptions in your forms after they get certified and/or ubiquitized and to handle the fact that you may not necessarily know for sure at which point in the form’s workflow that it’ll happen (if ever), you need to make sure that when you’re working with the sourceSet model, you’re actually using a cloned in-memory copy of the original sourceSet model rather than using the original sourceSet model directly.

Cloning Form Nodes

Don’t worry: You don’t have to be a scientist to use this simple technique. Using the

clone(deep)

method on the node that defines the particular data connection you’re wanting to modify within the SourceSet model and making sure your script keeps using the clone instead of the actual definition will do the trick. This method accepts a boolean parameter which, when set to 1 (or true), will clone the node and all its children (which is definitely what you want to do or else you will only get a shell instead of the full data connection) and return a reference to the in-memory copy.

As an example, let’s consider the following script taken from the Data Drop Down List object (found in the Library palette’s Custom tab):

...
var oDB = xfa.sourceSet.nodes.item(nIndex);
...
// Search node with the class name "command"
var nDBIndex = 0;
while(oDB.nodes.item(nDBIndex).className != "command")
  nDBIndex++;

oDB.nodes.item(nDBIndex).query.recordSet.setAttribute("stayBOF", "bofAction");
oDB.nodes.item(nDBIndex).query.recordSet.setAttribute("stayEOF", "eofAction");

Notice that the script first obtains a reference to a data connection node found within the original sourceSet model and then goes on to modify some of its properties. In an XFA 2.4 form loaded in Acrobat 8+, prior to certification/ubiquitization, this will function properly although it’ll stop functioning if the form ever gets certified/ubiquitized. In an XFA 2.5 form, however, it’ll immediately fail with a security exception simply because Acrobat 8+ determines that the sourceSet model may eventually become protected and protects it from the start.

Applying the cloning technique to this script is trivial. All you need to do is change the line which accesses the sourceSet model to this:

// JavaScript:
var oDB = xfa.sourceSet.nodes.item(nIndex).clone(1);
// FormCalc:
var oDB = Ref(xfa.sourceSet.nodes.item(nIndex).clone(1))

Notice the clone(1) method appended to the end of the statement. At that point, “oDB” now receives a reference to a copy of the original sourceSet model which it’s free to modify regardless of the form’s certification/ubiquitization status. (Also note that in FormCalc, you have to wrap the statement in a call to the Ref() function which will ensure you get a reference to the cloned object.) The rest of the script doesn’t need to be modified at all!

Note that you could just as easily store the cloned data connection node into a Form Variable or a variable defined in a Script Object in order to reference it again at a later time if you make modifications to it that you would like to persist while the form is running in Acrobat.

Updated Library Objects

If you had already installed Designer 8.0 and tried using the Data List Box and Data Drop Down List objects under the Custom tab in the Library palette, you more than likely ran into the security exception I described earlier. That’s because those custom objects managed to miss the ever so important update which they required in order to function properly in XFA 2.5+ forms with Acrobat 8+ (as we saw in the previous section).

For your convenience, I’ve posted updated versions of both the Data Drop Down List and Data List Box custom Library objects which you can save to your local system and add to your personal (or shared) Library in Designer 8.0.

Updated: December 11, 2006
Updated: March 10, 2010 — Added pointer on using Ref() function in FormCalc to get a reference to the cloned data connection.


Posted by Stefan Cameron on December 7th, 2006
Filed under Acrobat,Data Binding,Designer,Scripting,Tutorials

Displaying All Records from an ODBC Data Connection

So far, I’ve covered two ways of connecting forms to ODBC data sources:

  1. Connecting a Form to a Database — explains how to design a form which lets the user iterate through each record one at a time; and
  2. Selecting Specific Database Records — takes the first tutorial one step further by providing a means to specify which record(s) to view.

This time, in response to Y. Gautham’s recent comments, I’ve decided to post a little tutorial on displaying all records from an ODBC data connection for reporting purposes (as opposed to editing).

XML Schema vs ODBC Data Connections — What’s the difference?

Those of you who have been using XML Schema data connections might think this is just as easy to do but it actually involves some scripting and some knowledge of the Instance Manager. This is due to the differences in the way data is loaded between the two data connection types: XML data loaded via an XML Schema data connection is loaded completely. This allows you to use bindings like “$record.XMLSchemaDataConnection[ * ]” to bind all instances of a repeating data node to a subform and therefore cause a new instance of that subform to be generated for each instance of the repeating data. On the contrary, ODBC data connections are normally used to iterate through records and therefore only one record is loaded at any given time. Because of that, you can’t binding a repeating subform to a binding like “$record.ODBCDataConnection[ * ]” in order to get one instance per record because only one record will ever be loaded at any given time. (That’s not to say that the binding doesn’t work — it does, in fact, but you never get more than one record and therefore you never get more than one instance of the subform).

Where to start?

At this point, I’m assuming you’ve already created an ODBC data connection using the Data View palette — similar to what you may have done when following my previous ODBC data connection tutorials.

Since my goal is to display all records in an ODBC data connection, it would be nice to “hit the ground running” with some pre-canned script. The Data List Box (found in the Library palette’s Custom tab) object’s Initialize script will give me a good start because it’s already designed to iterate through records in a data connection and populate a list box with record data.

Modifying the Data List Box script

In order to list all data from all records from an ODBC data connection, I’ll need to use a container into which I can add items. One way to do this is to use a repeating subform inside a flowed container. This will let me use the repeating subform’s Instance Manager in order to add a subform for each record I find.

For my form (based on the Movie Database from my previous database tutorials), I decided to use the page subform as my record data container (and named it “MovieSF”) since it’s already in a flowed subform (that is, the root subform, named “form1” by default). In the MovieSF subform, I then placed title, showTime, category and actor fields and specified “None” as the binding for each field and the MovieSF subform. Then, I specified that it should repeat for each data item using the Binding tab in the Object palette and specified no min, max or initial count. Finally, I placed the Initialize script from the Data List Box into form1’s Initialize event.

A note on bindings

Notice that I specified a binding of “None” (which means I explicitly specified that objects should not be bound to data nodes in any data connection) for the MovieSF, title, showTime, category and actor objects using the Binding tab in the Object palette. I did this to avoid binding problems later where you might end-up with an instance of the MovieSF subform for each record but no data in the fields and this is related to implicit bindings attempting to execute on each instance (or explicit binding if you explicitly specified which data node an object should be bound to).

Making the script look for the right data

The first step in modifying form1’s Initialize script (based on the Data List Box’s Initialize script) is to make sure it’s looking for the right data nodes. This is a little difficult to explain without using a diff tool so you’ll have to check-out my sample form (linked later in this post) to see it in detail. I will, however, highlight the main point of modification for this step which is labeled “Find the data nodes” in the script:

var oTitleDataNode = null;
var oShowTimeDataNode = null;
var oCategoryDataNode = null;
var oActorDataNode = null;

for (var nColIndex = 0; nColIndex < oRecord.nodes.length; nColIndex++)
{
  if (oRecord.nodes.item(nColIndex).name  "title")
  {
    oTitleDataNode = oRecord.nodes.item(nColIndex);
  }

  if (oRecord.nodes.item(nColIndex).name  "showTime")
  {
    oShowTimeDataNode = oRecord.nodes.item(nColIndex);
  }

  if (oRecord.nodes.item(nColIndex).name == "category")
  {
    oCategoryDataNode = oRecord.nodes.item(nColIndex);
  }

  if (oRecord.nodes.item(nColIndex).name == "actor")
  {
    oActorDataNode = oRecord.nodes.item(nColIndex);
  }
}

Notice how I’ve added a couple of objects and changed the contents of the For loop to look for each type of data node I need (and which is mapped using the MovieDataConn data connection).

Generating MovieSF instances for each record

This is the brains of the script which generates a new MovieSF subform instance for each record found in the MovieDataConn data connection. This is done using the “_MovieSF” Instance Manager:

while(!oDB.isEOF())
{
  // Create a new instance and get a reference to it.
  var oNewMovie = _MovieSF.addInstance(0);

  // Populate the fields inside the new instance.
  oNewMovie.title.rawValue = oTitleDataNode.value;
  oNewMovie.showTime.rawValue = oShowTimeDataNode.value;
  oNewMovie.category.rawValue = oCategoryDataNode.value;
  oNewMovie.actor.rawValue = oActorDataNode.value;

  // Move to the next record in the data connection,
  //  thereby causing all data node references to be
  //  updated accordingly.
  oDB.next();
}

You should take note of how I save a reference to the new MovieSF subform instance into a local variable which I can then use to populate its fields using the appropriate data nodes. Also, if you’re wondering why I’m specifying zero as the parameter for the addInstance function, here’s why (in short, because I don’t want to merge the new instance of the MovieSF subform with data).

The goods

If you’re curious to see how my sample form works, here it is:

Download Sample [zip]

Minimum Requirement: Designer 7.0, Acrobat Standard 7.0.

Don’t forget to create a System DSN named “FormBuilderDB” using the included SQL file.

Updated: October 17, 2006


Posted by Stefan Cameron on October 12th, 2006
Filed under Data Binding,Instance Manager,Scripting,Tutorials

Selecting Specific Database Records

Every now and then, someone posts a comment with a question on how to do something and the answer requires more than just a quick response. In this case, it was Ricardo’s question on how to select a specific record from a data connection to a database for editing in a form.

If you read my previous post on Connecting a Form to a Database, you might’ve realized that the result was a single live data connection to the entire set of records in a database. This is great if you want to iterate through all records one at a time and update them on an individual basis. You might’ve also realized that you could narrow the scope of the data connection by specifying a more specific SQL statement (with a WHERE clause, for example). But what if you wanted the form to filter, on the spot, the data loaded from the data connection? For example, you might want to let the user pick from the different movie categories (action, comedy or drama) and then let them iterate through only that subset of the Movie Database.

If you’ve been scratching your elbow, pinching your nose and blinking your eyes in hopes that this might “just work”, well, it’s actually scratch your nose, pinch your elbow and roll your eyes — ok, just kidding…

The idea with this sample (based on the Movie Database) is to design a form which has a drop down list for picking a movie category and then a subform (which appears only once a category has been selected) that contains the movie data for all movies with the selected category.

The key to achieving this functionality is to use two data connections. (It’s important to note here that while you may only have a single data connection which loads data from an XML Data file, you may have any number of data connections to web services (WSDL) and databases (ODBC).) Furthermore, the use of SQL statement is crucial to making this work properly.

xfa.sourceSet.{DataConnectionName}

When you define a data connection in the Data View palette, you’re actually defining a <source name=”{DataConnectionName}”> node within the <sourceSet> packet inside the XDP file (which is then wrapped in a PDF if you save your form as a PDF file). Since this is defined in the XDP using XML, you can access its properties just like you can get at the properties of the objects you place on your form.

In this sample, I’ve defined two data connections to the Movie Database:

Two Data Connections

If you look at the XML Source which describes these connections, you can see that there’s an interesting command node which contains information about the query currently being used by each data connection. That’s what we ultimately want to modify once the user picks a movie category:

Source Set XML

//query@commandType

You should note that the query node’s commandType attribute value is very important. Setting it to text will let you specify the SQL statement used by the data connection. Other possible values are table (to let you specify a table name for the data connection) and storedProc for specifying a stored procedure.

Data Node Names

Another very important thing to note is the names given to the data nodes in the MovieCategories data connection. You’ll notice that the following SQL statement is used for the data connection:

SELECT id as catId, name AS catName FROM movie_categories
GROUP BY name ORDER BY name;

In particular, the id and name columns have been renamed to catId and catName, respectively. That’s because having data nodes with the names “id” and “name” in your data connection will give you a lot of headaches when attempting to iterate through the xfa.record.{DataConnectionName} node in order to find the data associated to the current record from a data connection (so that we can display the category names in the drop down list, for example). This is because the words “id” and “name” conflict with properties of the xfa.record object.

Building the Form

Category List

The first step is to use the Data Drop Down List object from the Custom tab in the Library palette. This is a really handy object that has code in its Initialize event that’s already setup to populate its item list based on data nodes from a data connection.

In the Initialize event of the object, set the data connection name to “MovieCategories”, the hidden value column name to “catId” and the display text column name to “catName”.

If you run the form at this point, you should get three values in the list: “Action”, “Comedy” and “Drama”.

Movies in the Category

Next, create a subform (let’s call it “movieData”) which contains fields with explicit bindings to the title and showTime data nodes from the MoviesInCat data connection using the Binding tab in the Object palette. Also, add the Data Connection Controls object from the Connecting a Form to a Database sample to this subform (making the proper adjustments for the data connection name in each button’s Click event script) and make this subform invisible.

At this point, you should have a form which displays a list of categories and contains an invisible subform.

Filtering Records Displayed by the movieData Subform

Finally, in the Data Drop Down List’s Change event, write a script which sets the SQL statement used by the MoviesInCat data connection, opens the connection and displays the movieData subform. For this sample, I chose to use FormCalc to script this event.

First, get the category selected by the user and determine it’s associated ID:

var sCategoryName = xfa.event.newText
var sCategoryId = $.boundItem(sCategoryName)

Given the XML structure of the <sourceSet> packet displayed above, you first set the query’s command type to “text”:

xfa.sourceSet.MoviesInCat.#command.query.commandType = "text"

This ensures that the data connection will use an SQL statement. Note the pound (#) prefix to the command property of the MoviesInCat node.

Then, set the SQL statement, on the MoviesInCat data connection, which will filter the records from the movie table in order to show only those that belong to the selected category:

xfa.sourceSet.MoviesInCat.#command.query.select =
  concat("SELECT title, showTime FROM movies WHERE categoryId = ",
    sCategoryId, " ORDER BY title;")

Finally, open the data connection, move to the first record and show the invisible subform:

xfa.sourceSet.MoviesInCat.open()
xfa.sourceSet.MoviesInCat.first()
movieData.presence = "visible"

Opening the data connection will cause the explicit bindings you set earlier on the fields in the movieData subform pertaining to the movie title and show time data to be used in order to load data from the xfa.record.MoviesInCat record (which will now contain the data from the first record of the MoviesInCat data connection as per the SQL statement we just built using the selected category ID).

If you want to “run” this sample, you can download the form and Movie Database here:

Download Sample [zip]

Minimum Requirements: Designer 7.0, Acrobat Standard 7.0.

Use the FormBuilderDB20060929.sql file to build the database, create an ODBC Connection named “FormBuilderDB” and load the form.

Update for Designer/Acrobat 8.0 forms: If you’re attempting to reproduce this sample or something similar in your own forms using Designer and Acrobat 8.0, you’ll most likely run into security errors when attempting to run the form in Acrobat 8.0. This is due to new restrictions imposed on modifying data connections at run time in XFA 2.5 forms.

Updated: February 6, 2007


Posted by Stefan Cameron on September 29th, 2006
Filed under Data Binding,Scripting,Tutorials