Using the Drawing Aids Palette
This is a palette I haven’t used very much in the past however it contains a lot of useful tools for working on form layout. You can show it either by choosing “Window menu > Drawing Aids” or by double-clicking on one of the rulers.
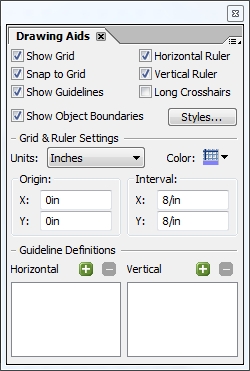
I won’t go into details about the obvious, self-explanatory properties like “show grid” but there are some that deserve to be called-out since they do interesting things:
- Long Crosshairs: This is handy when you’re trying to align objects that are far apart and you don’t like using a lot of guide lines. Turn this on and you will have long crosshairs following your mouse around the canvas. Note that this is tied to visible rules so if only the vertical ruler is visible, you will only have a horizontal crosshair; if no rules are visible, you won’t have any crosshairs.
- Show Object Boundaries: Toggling this will show/hide the rectangle that’s displayed around every form object and choosing “Styles…” will give you a dialog where you can set colors for various object types.
- Units: This will set the units used in all palettes that have property values displayed as measurements. Set this to “Points” and all measurements will be in “pt” units. There are exceptions, however, like font size which is always displayed in points.
- Origin & Interval: Sets the origin and repeating interval for the grid, not the layout.
- Guideline Definitions: This is interesting because after adding guidelines (by dragging and dropping from the top left corner where the two rulers meet), you will always have a vertical and horizontal guideline but what if you only wanted the horizontal one? You can delete the associated vertical one here by removing it from the “Vertical” list.
Finally, there’s one last important detail to note: Almost all of these properties are form-specific which means you’ll have to set them for each new form you edit with the exception of “Show Object Boundaries” and associated style colors which are stored as an application setting and will affect all forms.
In order to have all forms use points and have particular initial guidelines, for example, you would have to edit the Designer Template file (TDS extension) which you use to create new forms with. By default, this is the Letter.tds file located in your “application settings” folder for Designer. On Vista it’s “%USERPROFILE%\AppData\Roaming\Adobe\Designer\{version}\EN\Templates\Blank” and on XP it should be “%USERPROFILE%\Adobe\Designer\{version}\EN\Templates\Blank”.
Posted by Stefan Cameron on May 4th, 2009
Filed under Designer
Both comments and pings are currently closed.

Hi Stefan,
I’m an SAP Adobe Forms Developer, I am a big follower(since 1 1/2 Year) of this Blog and frankly speaking I learned half of my Designing of Adobe Forms by following your forum threads.
I have a peculiar case that I want to display the subcript for a Mathematical text like: log2(X) actually the “2” in Log Expression is Base “2”. So how to display subcripts or superscripts in inputfields. Is any scripting needed or does Adobe Forms support this kind of texts?
Kindly excue if this post is no way related to Adobe Live Cycle Designer and also I couldn’t find the relevant category to post this message in that thread.
Please help me in finding a solution.
Thanks and Regards
Pradeep Goli
Pradeep Goli,
I’m happy to hear my blog has been so valuable to you!
Yes, you can display “subscript” in input fields. The only problem is that Designer doesn’t provide a way to precisely edit a field’s value font/paragraph formatting. That is to say, you can’t select a single character within a default value and format it; you can only format the default value as a whole.
In order to do the subscript on the log base, you would have to select the base character and set a negative baseline shift plus a smaller font size. This can be done at design-time by formatting the text in a text object then, in the XML Source view, copying the draw’s <value> node (and its contents) into the field as its <value> node (note that this is the value node directly parented to the field, not within its caption node):
If you wanted to do this at runtime, then you would have to make sure your field’s data type is “rich text” then, in script, build-out the XHTML as a string and load it into the field value’s <exData> node: