MAX 2008 Tutorial – Part 3 – Form Guide
Welcome to the third and final part of a three-part post series tutorial on importing data into a form guide and a PDF. The first part covered the form design, the second part covered the Flex code and the third part will cover designing and debugging the form guide that will complete the solution.
Form Guide Layout
The goal is to design a form guide which will provide two panels: one for user options and the other for results.
The first panel will expose the 4 fields inside the GuideObjects subform (which are only meant to be exposed in the form guide — hence why the GuideObjects subform has the Initialize script to hide it if the host isn’t “Flash”). The user will have the option to choose an actor and/or category for further filtering and will then click on the GetMovies button to execute the request on the Movie Service. When the requested XML is returned to the form guide, the GetMovies result handler will convert the XML into instances of MovieRow inside the Listing table.
The second panel will use a repeater layout to expose the Listing table’s contents within the form guide however this panel will only be accessible if the movie query returned 1 or more results.
Once the results are in, the user will then be able to switch (“flip”) to the PDF view which will show the Listing table in the form, from which the user could then print or archive the results.
Designing the Form Guide
Open your tutorial form in Designer and launch GuideBuilder (GB) by choosing the “Tools > Create or Edit Form Guide” command. Switch to the “Customize Appearance” tab and choose “Save Styles”, saving them to a SWC file of your choice (usually in the same folder). It’s not mandatory to do this but if you don’t specify a file name here, GB will auto-generate a style SWC (which contains information about any style customizations you might apply) named according to the wrapper you choose (e.g. “ga.wrappers.CobaltStandard.swc” for the “Cobalt Standard” wrapper — not the most meaningful name for our solution).
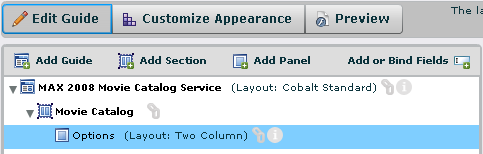
Back to the “Edit Guide” tab, set the guide’s title to “MAX 2008 Movie Catalog Service” (double-click on the “New Guide” label to set it), the section’s title to “Movie Catalog” and the panel’s title to “Options”. Set the panel’s layout to “Two Column”.
Options Panel
Click on the “Add or Bind Fields” button and drag the entire GuideObjects subform into the panel. You’ll see, in the “Panel Preview” pane on the lower-right, that objects in the panel are laid-out in two columns from left to right, top to bottom, according to the top-down order in which they appear in the panel. What we want is for the MatchCount field to show-up below the GetMovies button. To do this, insert a “Next Area” object (from the “Utility Objects” group at the top of the form tree) after all the objects in the panel and then drag the MatchCount field below it. The “Next Area” object causes a break in the layout algorithm, thereby forcing the following object onto the next row in the two-column layout.
To make the panel layout more pleasing, switch back to the “Set Properties” view and set the captions of the ActorList, CategoryList and MatchCount fields to be at the top and the width of both listboxes to be “100%”. Finally, override the MatchCount field’s caption (double-click on it) and set it to “Number of movies matching criteria:” (accept the warning about the caption binding being removed).
One important form guide feature is the ability to display fields in different ways. In other words, if your field is a listbox, for example, you aren’t limited to displaying it as a traditional listbox. You could choose to display it as a series of checkboxes or radio buttons, for example, or you could create your own custom control using FlexBuilder.
GB provides a checkbox control type which will suit our needs perfectly because while our listboxes are single-selection only, using checkboxes will allow the user to remove a previous selection which is important if they previously filtered by actor, for instance, and now they want to remove that filter.
For the ActorList and CategoryList fields, set their “Display field as a” property to “Check Boxes”.
At this point, the settings for the ActorList (and CategoryList) fields should look like this:

and your form guide hierarchy should look like this:

Movie Listings Panel
The second panel is a lot simpler since it just shows the Listing table’s contents and it doesn’t require as much settings.
Insert a second panel into the “Movie Catalog” section, give it a title of “Movie Listings” and set its layout to be “Repeater Grid”.

The objects named “Repeater First Column” and “Repeater Second Column” don’t apply to this type of repeater panel however they do matter in other repeater layouts and are there for consistency (should you decide to change the repeater panel type). The “Trailer” object signifies that all objects placed after it, on this panel, will go below the grid as opposed to being part of the grid (this would be good for footer objects, if we had any).
Drag the MovieRow subform (table row) into the panel between the “Repeater First Column” and “Repeater Second Column” objects (drop the subform directly in between the two objects — if you miss, just drag each object back to where it’s supposed to go).
For each field you dragged-in, set its caption as follows: “Title”, “Actor”, “Category” and “Cost”. (You should see these changes in real-time in the Panel Preview pane.) Select the Title item and set its width to 150 (which means pixels in the form guide) to ensure the titles are completely visible and then set its “Allow field to repeat” property to indicate that it, and all associated fields, should be repeated within the grid layout. The items in the panel will then get a yellow outline indicating that they are repeating items.

Now that we’ve set this up, I’ll follow-up on a comment I made in part 1 when we designed the Listing table and set the MovieRow to have 1 initial instance: There’s a bug in the Repeater Grid panel layout where the data entered into the fields in the grid will not be rendered (it’s there, you just can’t see it) unless there’s some data in the grid when the form guide is initialized. To work around the bug, we simply include an initial instance of the MovieRow and then the GetMovies result handler code simply removes the instance prior to populating the table with movie results (whether there are any or not).
The last step in setting-up this panel is to apply a Display Rule to indicate when the panel should be visible (accessible to the user) in the form guide. What we want to do is set the panel to be visible only if the MatchCount field’s value is greater than zero, meaning there’s at least one movie result from the query. To do this, you simply toggle the “Specify panel display rules” pane in the panel’s properties, choose “Use Display Rules”, add a rule, set MatchCount as the field, “greater than” as the condition and “0” as the value.

FormBridge XFO Fix
Now that the form guide has been designed, the
re’s just one more thing we need to do: Apply a small fix to the FormBridge code that brokers the communication between the form guide and the PDF at runtime. The FormBridge code is normally automatically injected into the PDF when it’s generated by the GB Preview functionality or by LiveCycle when the form is rendered as a form guide with the PDF however we need to use our own “fixed” version of the FormBridge code. Otherwise, when we flip to the PDF, there will be no data in the table.
To do this, save your changes to the form guide and exit GB. Find the “Custom” pane in Designer’s Object Library and drag the “Form Bridge” object onto your form below the GuideObjects subform (where there are no objects on the page).

It shows-up as a hairline selection on the page and in the hierarchy looks like this:

Select the “ContainerFoundation_JS” script object and open the Script Editor to edit the script. Find the two instances of “saveXML()” (lines 316 and 631) using the Find dialog (Ctrl + F) and change them from
saveXML().replace(/\n/g, "");to
saveXML();Do not remove/change any of the code that comes before it on the same line. This fix ensures that the format of the data going across the line is correct.
With the FormBridge object in our form, GB Preview and LiveCycle will not inject their version into the PDF. The only draw-back from this approach is that if the FormBridge code changes, you’ll have to manually update it in your form as opposed to automatically getting the new version when you preview with GB or render your form with LiveCycle.
This bug should be fixed in a future release and so the workaround in the FormBridge code will eventually no longer be needed.
Flash Log and Debug Players (Optional)
You may have noticed some “trace()” statements in the code we set on the ActorList, CategoryList and GetMovies objects in part 2. This is a handy way to get a read on what’s going on (i.e. debugging) inside the form guide at runtime if you aren’t using FlexBuilder to debug it (which we’re trying to avoid in this tutorial). It’s a lot like using “console.println()” to output information to Acrobat’s JavaScript Console.
If you want to see trace statement outputs (it’s not necessary but it could be handy), you need to look at your flashlog.txt file which is auto-generated by the debug version of the Flash Player. These are normally called “debug players” or “content debuggers” and are downloadable here. To ensure that you have a debug player, you can hit this page which will tell you what version and type of Flash Player your browser is using.
Once you’ve installed a debug player, you’ll need to configure your system to enable the flashlog.txt file which will be located here, once enabled: C:\Documents and Settings\user_name\Application Data\Macromedia\Flash Player\Logs\flashlog.txt (XP) or C:\Users\user_name\AppData\Roaming\Macromedia\Flash Player\Logs\flashlog.txt (Vista).
The debugger configuration page details where to place the mm.cfg file and what to put in it in order to enable output to the flashlog.txt file. For example, if you’re running XP, you would create a new mm.cfg file in your “C:\Documents and Settings\user_name\” folder and you would put the following lines inside to enable error reporting and trace logging (i.e. output to the flashlog.txt file):
TraceOutputFileEnable=1
ErrorReportingEnable=1
Running the Solution
Now that the form guide is designed, we’re ready to run our solution: Launch GB again and this time, choose the Preview tab, select “Include PDF Preview” (to ensure that a PDF is included, otherwise you won’t be able to flip to it to see the results) and click on the Preview button.

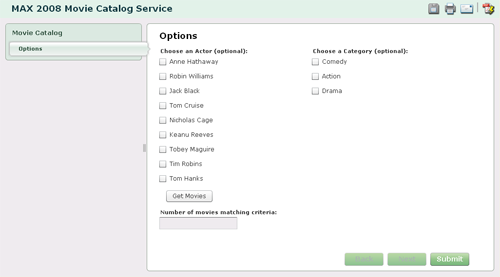
The resulting form guide should look like this (with the pre-loaded actor and category lists):
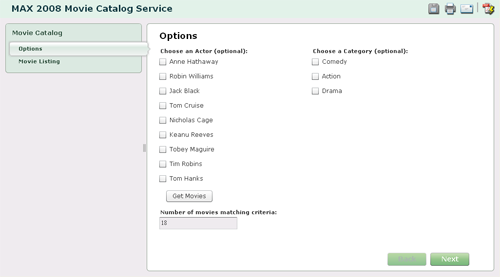
When you click on the “Get Movies” button, the button will become temporarily disabled and then, assuming your query returned movies, the count should be updated and the “Movie Listing” panel should appear in the left toggle bar:
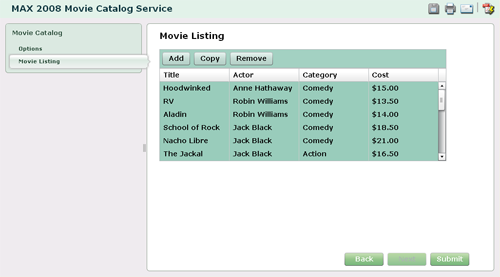
Now click on the “Movie Listing” panel to see the results in the form guide:
Finally, click on the “Show PDF” icon in the toolbar at the top-right to see the results (i.e. imported Movie Service data) in the PDF:

Cool? I think so! And the cherry on top is that this even works with the free Reader! Users don’t need Acrobat in order for the data to go back and forth between the form guide and the PDF.
Solution to Part 3
Try not to peek at this before you attempt to build the form guide on your own…
Minimum Requirements: Designer 8.2.1 SP1, GuideBuilder 8.2.1 SP1, Reader 9.0.
Note: If you decide to deploy this sample to LiveCycle (e.g. using FormsIVS), you’ll also need to deploy the styles SWC you created earlier. The form guide will not render without it.
Posted by Stefan Cameron on November 19th, 2008
Filed under Acrobat,Bugs,Conferences,Debugging,Form Guides,Scripting,Tables,Tutorials
Both comments and pings are currently closed.

Stefan,
Thanks so much for presenting that – it was extremely helpful, even for seasoned Form Guide users.
I’m still completely stoked that you can insert real Flex code into your XFA form – this will definitely change the amount of customisation we need to do with Flex Builder.
John.
John,
You’re welcome! Thanks for the feedback. I’m glad you found it useful!