Connecting a Form to a Database
In response to Lala and malik’s questions on connecting a form to a database (whether it’s Microsoft Access, MySQL, etc. doesn’t really matter), I decided to write a little tutorial on how to do it.
Even if you already know how to do it, I encourage you to pay special attention to the section on Auto-Incremented Table Columns because it might help you understand and resolve some of the issues you may have already run into.
Create a System DSN
First, you need to create a System DSN for your database using the ODBC Data Source Administrator Windows tool.
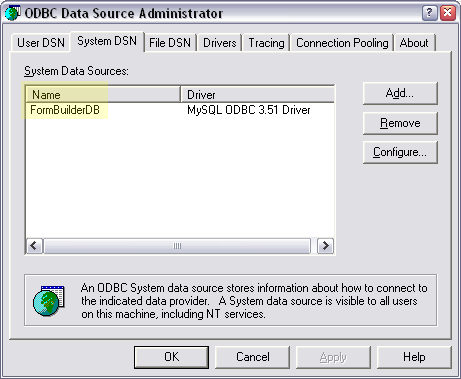
That will let Acrobat interface with your database when your form is opened in Acrobat in order to be read and/or filled. Because of the DSN, it doesn’t matter what kind of database you need to connect to.
For this tutorial, I’ll be using my FormBuilder database which contains the same kind of movie information found in the XML Data files from various other tutorials I’ve already posted:
This SQL file will create the database and a user if you’re using something like MySQL (for which you can also download a free ODBC driver). You should also be able to easily tweak it to create tables in a Microsoft Access database if that’s what you want to use.
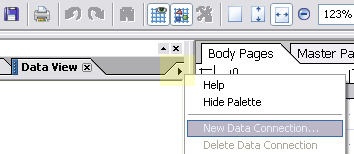
Make a New Data Connection
The second thing you need to do is create a data connection in Designer: From a new or existing form, open the Data View palette (you can use the “Window | Data View” menu item to open it) and choose “New Data Connection” from the palette’s fly-out menu.
In the “New Data Connection” wizard, pick “OLEDB Database” from the first screen, using the “Build” button on the next screen to open the “Data Link Properties” dialog, go to the “Connection” tab and pick the name of the DSN you created in the first step from the first drop down list. Then click the “Test Connection” button to make sure a connection can be established to the database via the DSN.
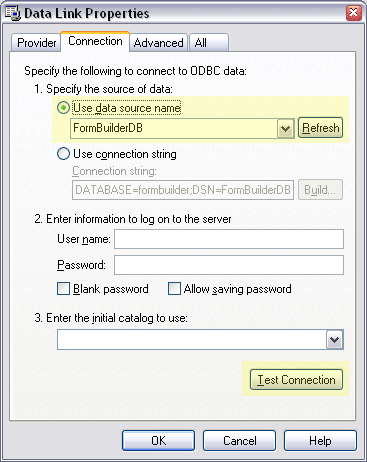
Click on OK to close the “Data Link Properties” dialog and return to the “New Data Connection” wizard. Now that you’ve chosen a DSN, you’ll be able to specify the resource within that DSN to which the connection should be made: You may either pick a Table from the list, specify a Stored Procedure or specify an SQL Query. If you’re connecting to a single table, you may be able to simply pick its name from the list of tables. If you need to connect to multiple tables in the same data connection, then you’ll need to use a Stored Procedure or an SQL Query.
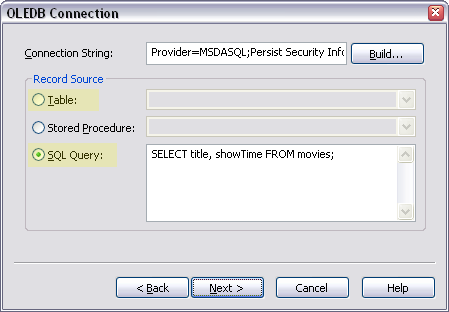
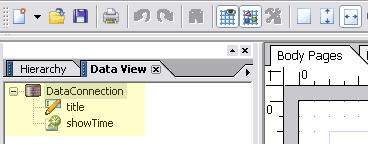
Auto-Incremented Table Columns
If the table you’re wanting to connect to contains any auto-incrementing columns, you must use the “SQL Query” option instead of simply choosing a table name from the “Table” option. If you pick a table with an auto-increment column, you’ll be able to read from it but you’ll get errors when you try to push data into it. If this is the case, write an SQL Query that selects all columns in the table except for those which are auto-incremented. In the image above, I chose “SQL Query” because the “movie” table I’m connecting to has an auto-incrementing column named “id” that needs to be excluded from the data connection.
Bind Fields to Data Connection Nodes
At this point, you should have a new data connection listed in the Data View palette which contains a list of “nodes”, one for each column in the table(s) you picked while setting-up the data connection:
The next step is to create fields to represent each node in the data connection and bind each field to its respective data node. The easiest way to do this is simply to drag & drop the nodes from the data connection onto your form. This is handy for two important reasons:
- The Data View palette has inspected the definition of each node and pre-determined the best type of field to use in order to edit its data.
- When you drop the nodes onto the form, the fields that are created are automatically setup to be bound to their respective data nodes.
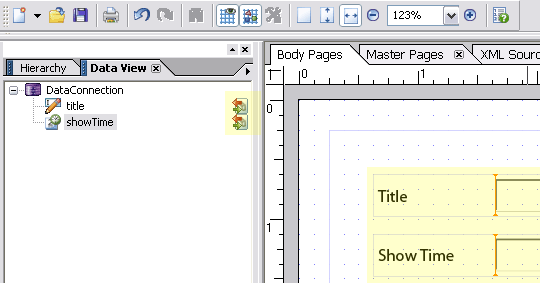
The database I’ve connected to is one that uses the Movie Data I’ve used in previous tutorials. In this case, I’ve connected to the Movie table’s “title” and “showTime” columns. Since the “title” column is described as VARCHAR, the Data View palette figured it should be a text field. As for the “showTime” column, described as TIME, it’s set to be a date/time field with its Data Format property preset to Time.
After you’ve completed this step, the Data View palette now shows the data nodes in the data connection as “bound” with special icons:
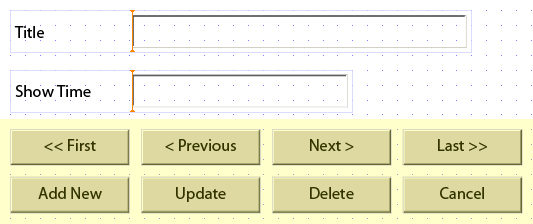
Add Control Buttons
The last step in this process consists in adding a set of controls to manipulate the records in the database obtained via the data connection. The simplest way to do this is to use a set of buttons where each is assigned one of the following statements (each statement is one line and provided in FormCalc):
xfa.sourceSet.{DataConnectionName}.first()
xfa.sourceSet.{DataConnectionName}.previous()
xfa.sourceSet.{DataConnectionName}.next()
xfa.sourceSet.{DataConnectionName}.last()
xfa.sourceSet.{DataConnectionName}.addNew()
xfa.sourceSet.{DataConnectionName}.update()
xfa.sourceSet.{DataConnectionName}.delete()
xfa.sourceSet.{DataConnectionName}.cancel()
where {DataConnectionName} should be replaced by the name you gave to the data connection you created earlier (“DataConnection” by default).
Each statement above represents a different action to take with the data connection: Move to the first, previous, next or last record, add a new record, update or delete the current record and cancel changes to the current record, respectively.
Note that the “first”, “previous”, “next” and “last” statements imply an “update” by default which means that if you simply use
xfa.sourceSet.{DataConnectionName}.next()to move to the next record and the user has made changes to the current record, those changes will be committed prior to moving to the next record. If you want those navigation controls not to commit changes (and therefore require the user to explicitly click on the “update” button in order to apply any changes to the current record), you must specify the cancel statement prior to the next statement:
xfa.souceSet.{DataConnectionName}.cancel()
xfa.souceSet.{DataConnectionName}.next()
To help you do this quicker now and in the future, here’s a Library Object Snippet that you can place into the Custom tab of the Library palette (you’ll have to save the XFO file to the following folder on your system: C:\Documents and Settings\{userid}\Application Data\Adobe\Designer\en\objects\custom where userid is your windows user id).
Download Data Connection Controls Snippet [xfo]
Minimum Requirements: Designer 7.0, Acrobat 7.0.
Once you place the file in the folder indicated above, you’ll then have a new object in the Custom tab of your Library palette named “DataConnectionControls”. Simply drag the object onto your form and the buttons will appear, all pre-configured and ready to go.
Run Your Form
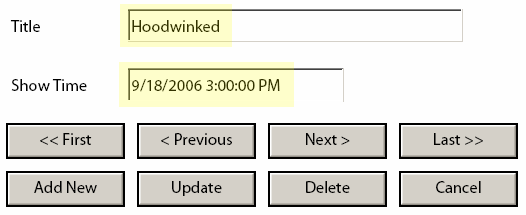
Now that the DSN, data connection, fields, bindings and navigation controls have been setup, you should be able to preview your form in Acrobat Pro and see the first record in the database table(s) pre-loaded into the bound fields.
If you’re having problems getting this going, you can check-out my form (assuming you’ve created the FormBuilder database and a DSN for it) to see if you missed any steps:
Minimum Requirements: Designer 7.0, Acrobat Standard 7.0.
Updated: October 17, 2006
Posted by Stefan Cameron on September 18th, 2006
Filed under Data Binding,Tutorials
