Stefan Cameron on Forms
Building intelligent forms using Adobe LiveCycle Designer

'Designer' Category Archive

Handling List Selection Changes

This is something I get asked a lot so I thought I’d write a little tutorial on how to handle a selection change in a list object (drop down list or list box).

Single Selection Lists

All XFA events have an object that represents properties about the event currently in execution:

xfa.event

This object holds many interesting properties but the one that’s important here is the newText property which, for a list, contains the new selection.

It’s important to note that there are two types of list items: Ones that have text data only and ones that have both text and value data. By default, the Object palette creates lists with items that have text data only. On the Field tab, you can add/remove items and specify their text data while on the Binding tab, you can optionally set each item’s value data by checking the “Specify Item Values” box.

The xfa.event.newText property always returns the text data. You can access the value data associated with the new text data by using the list’s boundItem() method:

// get the value data associated with the new selected text data
var newValue = MyList.boundItem(xfa.event.newText);

For single selection lists, you can therefore use the text data or get the associated value data for the new selection and do something from there. The following code sample gets the new selected value data in a list object’s Change event and changes the list’s background color accordingly:

var newValue = this.boundItem(xfa.event.newText);

switch (newValue)
{
    case 1:
        this.fillColor = "255,0,0"; // red
        break;

    case 2:
        this.fillColor = "0,255,0"; // green
        break;

    case 3:
        this.fillColor = "0,0,255"; // blue
        break;
}

Multiple Selection Lists

List objects may also support a multiple selection of items. You can specify that the list supports multiple selection by setting the “Object palette > Field tab > Allow Multiple Selection” property but you cannot specify a default selection of multiple items using the Object palette (only a single default selection is supported though it still works for lists that allow multiple selections). You would have to use the list’s Initialize script to do that.

At runtime (e.g. in Acrobat/Reader), you may select multiple items in the list by using the Shift and Ctrl keyboard keys: Shift + Click will select all items from the last selected item to the item you click on and Ctrl + Click will add/remove individual (non-sequential) items to/from the selection.

Determining the selection in a multiple selection list is different from doing so in a single selection list because you have to deal with the fact that more than one item may be selected. There is also a difference in the event you must use in order to handle the change in selection: When you set the “Allow Multiple Selection” property, the “Object palette > Field tab > Commit On” property changed to allow only a setting of “Exit” (as of Designer 8.1; Designer 8.0 may have still allowed “Select” to be chosen however I recommend setting this property to “Exit” if you have the choice) which means that the change in selection — as far as the list is concerned — will only take place once the user exits the list (once they hit the Enter key, tab away or click away from the list) rather than immediately when they visually change the selection. The result is that you must handle the change in selection in the Exit Event rather than in the Change event as in single selection lists.

You can handle a change in single selection lists using the Exit event as well however for single selection lists, it’s usually preferable to handle the change immediately rather than once the user leaves the list. For multiple selection lists, the idea is that the user may click more than once to set the selection they want so you typically want to react to the change only once they’re done which is why the selection is only committed once the user exits the list.

Determining the set of selected items was really difficult leading up to Designer and Acrobat/Reader 8.0 when the new list object properties and methods were finally introduced. These new APIs make it much easier to deal with lists that contain multiple selections: Use the length property to iterate through the items, the getDisplayItem method to get the text data associated with an item, the getSaveItem method to get the value data associated with an item and the getItemState method to determine whether the item is selected or not.

Here’s our sample script from earlier that sets the background color of the list object after a change in the selection (in the list’s Change event) however this time the script is meant for the Exit event and the list supports multiple selection. The color values are combined if more than one is selected, producing more color combinations up to white (an RGB color value of “255,255,255”) then all 3 items are selected:

// array with 3 elements, all at zero initially
var rgb = new Array(0, 0, 0);

for (var i = 0; i < this.length; i++)
{
    if (this.getItemState(i))
    {
        // item is selected
        // item values are 1, 2 or 3 (1-based)
        // array elements are 0, 1 or 2 (0-based)
        rgb[this.getSaveItem(i) - 1] = 255;
    }
}

// Array.toString() produces a comma-delimited string containing the
//  values of the array elements so this will produce "255,0,255" if
//  items 1 and 3 are selected.
this.fillColor = rgb.toString();

If you give this a try, remember to create a list with 3 items (1, 2, 3) and place the script in the Exit event, not the Change event. Then remember to click away from the list once you’ve set the selection at runtime.

Multiple Item Default Selection

Setting a default selection of more than one item is unfortunately not something that Designer supports. To achieve this, you’ll need to set the list’s Initialize script to do the work. For example, to initialize a multiple selection list of 5 items where items 1, 4 and 5 are selected, you would do this (remember that list item indexes are 0-based, not 1-based) in the list’s Initialize event:

this.setItemState(0, true); // item 1
this.setItemState(3, true); // item 4
this.setItemState(4, true); // item 5

Sample

To see this in action in what you might consider a more realistic example, my “What About the Other Field?” tutorial uses single selection lists that show an “other” field when their “other” item is selected.


Posted by Stefan Cameron on October 27th, 2008
Filed under Acrobat,Designer,Events,Scripting,Tutorials,XFA

New Form Design Best-Practices Blog

John Brinkman, a colleague of mine at Adobe and the LiveCycle Forms Architect no less, has decided to start a new blog on form design. It looks like he will be concentrating on on best-practices relating to form design and scripts based on past experience with forms from various customers (in other words, based on real-world forms).

Hi first post relates to exclusion group-like functionality using any type (or combination) of fields in a subform where each field is treated as a mutually-exclusive radio button. Check it out, it works very nicely!


Posted by Stefan Cameron on October 15th, 2008
Filed under Designer,Events,Scripting,Tutorials

Tab Order Video Tutorial

I noticed that Alex Kalaidjian, from the LiveCycle Designer Team, has posted another training video on Adobe’s LiveCycle DevNet. This time it’s on tab order, which is a great complement to my tab order article from the other day. Alex shows just how easy it is now to fix some common tab order issues with your forms using the new user interface for tab order available in Designer 8.2.


Posted by Stefan Cameron on October 7th, 2008
Filed under Designer,Tutorials

Hyperlinks in Form Objects

The newest releases of Adobe LiveCycle Designer and Adobe Acrobat/Reader (versions 8.2 and 9.0, respectively) add support for hyperlinks in form objects. You can set hyperlinks to websites, files or email addresses in text objects and field captions.

Text Objects

Creating hyperlinks is easy. Consider the following text object (I’ve bolded one word to highlight the fact that hyperlinks work with plain and/or rich text):

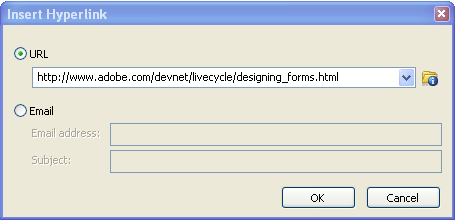
To set “Adobe LiveCycle Developer Center” as a hyperlink, simply highlight the text and choose “Insert Hyperlink” from the context menu or choose “Insert > Hyperlink” from the top-level menu. You’ll get the following dialog where you can specify the URL or email information (notice you can even set the subject of the new email if you set an email hyperlink):

That’s it! Pretty simple. Once the hyperlink is created, you can edit it again by choosing “Edit Hyperlink” or you can remove it by choosing “Remove Hyperlink” from the context menu. You can also choose “Open Hyperlink” to test that the link is valid.

Over in Acrobat/Reader, when the user hovers their mouse over the hyperlink, the cursor will change to a small hand with a “w” over it and a tooltip will appear indicating the hyperlink destination:

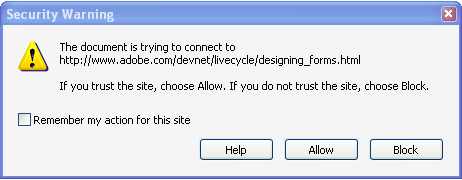
Clicking on the hyperlink will result in a security dialog providing the user with the opportunity to “allow” or “deny” Acrobat’s request to open the link. (Before you ask, the security dialog cannot be avoided. I did notice that it sometimes doesn’t appear when you click on a hyperlink within the context of Designer’s “PDF Preview” tab but it will definitely appear when the form is run within Acrobat/Reader on its own.)

Field Captions

As I mentioned earlier, you can also set hyperlinks on field captions. This could be really handy, especially to provide extra help. Consider the scenario where a drop down list is asking a user to choose a policy. It might be useful to provide a way for the user to obtain more information about each policy. Before the hyperlink feature was added, you would’ve had to use a button with the following script in its click event:

xfa.host.gotoURL("http://www.somewhere.com/policy-help/");

That doesn’t look really nice. Sure, you could take the time to format the button’s appearance to remove the highlight, remove the border, remove the background color and set the font to “blue + underline” but that’s a lot of work. Now you can just make a hyperlink out of the word “policy” with just a couple of clicks (and it looks much better too):


Posted by Stefan Cameron on October 6th, 2008
Filed under Acrobat,Designer,Tutorials

Restoring the State of your Form

This is a guest post from my colleague Anatole Matveief who works on XFA-related features in Acrobat. In this post, Anatole introduces a really cool feature available since Acrobat 8.0 and Designer 8.0 called “formstate” which allows you to persist non-data related changes to your forms and restore them when the form is subsequently re-opened.

Minimum requirements (to use the forms in this tutorial): Acrobat Standard 8.0, Designer 8.0

FormState

In Acrobat and Designer 8, Adobe introduced the concept of saving a form’s state in XFA Forms. First a quick review: An XFA Form file usually contains a template and data. When the form is opened, the template instructs the runtime engine (like Acrobat, Reader or the server) how to create the Form DOM given a set of data. The user can then interact with the form. After the user fills the form, Reader or Acrobat will save the data. When the form is then reopened, Acrobat or Reader will take the saved data and once again do the merge to create the form.

However, many customers encountered a problem: They wanted to save or persist an element of the form that was not bound to the data. For example maybe in the process of filling the form, some captions changed, or the color of fields changed. Or maybe the number of instances in an unbound subform changed. Since these changes were not bound to data they would not be restored the next time the form was opened, since only the data was saved.

In Acrobat 8 this changed. Now by default, the state of the form, or its formstate is saved. This means that all those changes in the form that happened at runtime that weren’t bound to data will be restored next time the form is opened.

Automatic State Restoration

As an example, open formstate-auto.pdf in Acrobat. Click on the “Change Country” button once or twice, which runs a script to change numerous properties on the form to make it into a US form or Canadian form. These include colors, captions, and the number of instances in a subform, values, and the items in a list. Now save the file. When you open the form again, the captions, colors number of instances, unbound field values, and list items will be as they were when you saved. This would not be the case prior to Acrobat 8.

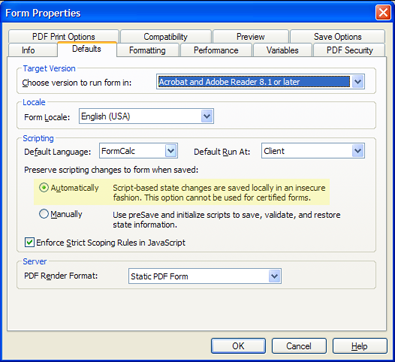
Here is the setting in Designer 8.0 that controls this automatic form state saving:

In the XFA Language it’s the property in the root subform called “restoreState”. The default value is:

restoreState="auto"

Now, as with most good things in life, it’s not quite so simple. Now that form state is restored, we open up a potential security issue. What if someone gets your form, changes a caption from “Address” to “Password”, then changes another caption to read “SSN”? When they save the file, the next time your intended customer opens the file they’ll see the spoofed captions, not the captions the original author intended! That is, the author’s intent has been compromised. So how do we get around this issue?

Manual State Restoration

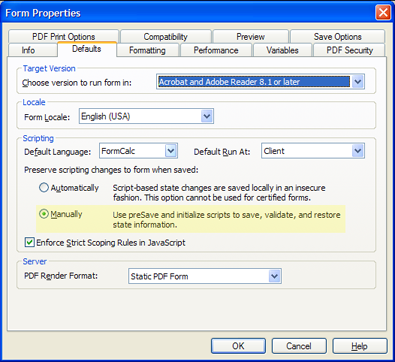
There is now also the option to restore formstate manually, specified in the XFA Language on the root subform as:

restoreState="manual"

Or in Designer by selecting the second radio as shown here:

What does this mean? This means that the form author decides, through script, what parts of the form will be restored when the file is reopened. In fact, for certified forms, this is the only way to restore form state. Certifying an XFA Form is disallowed if the formstate’s restoreState is set to “auto”.  (If for some reason the form does get certified, by a previous version of a product that doesn’t enforce this rule for example, Reader or Acrobat will not restore the formstate on open.) First let’s see an example using a form with restoreState=”manual”.

Open the file formstate-manual-noscript.pdf. Click the “Change Country” button once or twice, save, close and reopen the file. Notice that only values are restored. The properties changed by script are not. The exception to this rule are the unbound field values and the number of subform instances, as shown on the form. This means that even for restoreState=”manual”, unbound field values (where bind=”none”) and subform instances are restored.

So what do you do if you want to manually restore the form state? Thankfully, there is a simplified method to doing this by using script.

Open the file formstate-manual-script.pdf. Follow the same steps as before. When you reopen the file you’ll see that the entire state is restored. This is accomplished by placing this script on the Form:Ready event of the root subform:

// this script restores all the deltas manually.
var oList = this.getDeltas();
for (i=0; i < oList.length; i++)
{
    var oDelta = oList.item(i);
    oDelta.restore();
}

You can also be more selective about which fields, and even which properties within those fields you restore.

Open the file formstate-manual-script-partial.pdf. Follow the same steps as before. When you reopen the file you’ll see that only parts of the state are restored. This is accomplished by placing different scripts on different fields, and by not placing some scripts at all. For instance the form places the following script on the listbox to restore only the list items (it does not restore the color):

// this script restores the delta for the "items" (in XFA,
//  it's the <items> element) property of this listbox only.
// Ie the color is not restored but the items in the list are.

var oListDelta = this.getDelta("items");
oListDelta.restore();

You can use a similar script to restore only certain attributes of the field.

Technical Note: One important point here is that the script runs on the opening of the form when the formstate is being restored. The entire state of the form is always saved when the file is saved. But Acrobat/Reader will always check the script to restore only the parts of the form state that are specified. Why isn’t there a script to choose what part of the formstate to save? That wouldn’t be secure: A malicious person could intercept the form in transit, and inject additional information in the formstate before it reached its target. However if the script runs when the form is opened and state restored, then the script will ignore any section the author did not intend to be restored. Of course the security assurance works only if the form is certified, since certification ensures the integrity of the template, where the formstate restore script (which you implement) lives. Ie, the script which does the state restoration is covered by the certification, so we can be sure the script wasn’t tampered with.

Summary

The new formstate feature:

  • allows saving state in the form where that state is not bound to data — which is a good thing since you don’t necessarily want to “mess up” your data, which may need to comply to an XML schema, with formstate-related information.
  • has an automatic mode which just restores the entire state from the last time the file was saved.
  • has a manual restore mode, for added security. This manual mode:
    • is required if you plan on certifying your form
    • is made easier by the use of deltas
    • allows you to pick and choose exactly what parts of the formstate to restore.

Posted by Stefan Cameron on September 29th, 2008
Filed under Acrobat,Designer,Scripting,Tutorials,XFA