Connecting to a Schema
In previous tutorials, I have shown how to connect an XFA form to a database and a web service. Next on the list is the XML Schema (XSD).
If you work in an enterprise setting, chances are you may have already had to deal with corporate data schemas that define how that data is structured. The goal, when connecting a form to a schema, is to ensure that the data consumed and output by the form adheres to a specific structure. Any fields bound to data nodes that aren’t inside the schema space are basically ignored at time of submission.
To help put things in context, I decided to define a schema for movie rentals to stay on the movie theme for the data I used in my other data connection tutorials.
Before we get started, I wanted to point-out that there are so many features related to schema handling and the Data View palette that I won’t be able to cover them all in a single tutorial. It would be information overload. Instead, I’ll try to point-out the basics along with a few interesting things that I think would be useful.
Creating the Connection
Right-click in the Data View palette and choose “New Data Connection”. In the first step, set the name for the connection (I set it to “SchemaConnection” so it’s easy to identify amongst any other connections that might be defined) and choose “XML Schema” as the type.
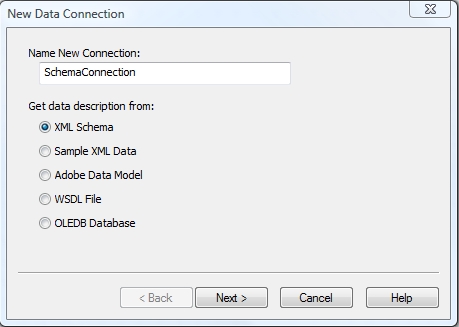
Note that while you may have multiple ODBC and web service data connections, a form may be connected to only one schema. As of XFA 3.0 (Designer ES2, Acrobat/Reader 9.1), however, you can inject foreign data nodes into the Data DOM even if they aren’t in the schema, which may help if you need to get extra data into/out of your form (a topic for another post; for now, have a look at the new “File > Form Properties > Data Binding tab” in the Designer ES2 Beta). You can also merge schemas into a single, larger schema (<import/> nodes are supported which can make importing multiple schemas into a single one relatively easy).
The next and final steps are to choose the schema file and root element. Depending on how your schema is defined, you may have a choice of elements to use as the root. In the Movie Rental schema, there is only one root: “movieRental”.

There are other options that let you embed the schema definition into your form (good if you don’t want to have to keep the schema file along with your form; otherwise, whenever you edit your form, you will need to ensure that the schema file is available) as well as specify XSLT files for incoming and outgoing data transformations (also a topic for another post).
Data View Palette
The initial view of the connection in the palette shows the data structure specified by the schema as represented in XFA. Each node in the schema gets an associated XFA object type depending on its description.

For example:
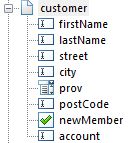
- Complex types (such as {customer} and {movie}) are usually mapped to subforms since they are elements that contain child elements.
- Simple types (such as {customer.firstName} and {customer.prov}) are typically mapped to XFA fields. As you can see, the Schema Data Connection Wizard detected various types and assigned specific XFA fields to each data node: The {customer.prov} node is set to a drop down list because that element is defined as an enumeration of specific values in the schema while {movie.cost} is set to a decimal field because it’s type is “xs:decimal”.
Root Subform Name
When the connection was created, there was a change to your form’s root subform name. Note how it has changed to movieRental:
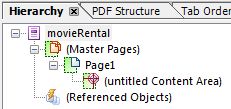
The name of the root subform is always the name of the root data element in the Data DOM. This ensures that data submitted from the form has the correct root element to match the schema and data merged into the form will be bound first by the root subform, then by child form objects.
Inserting New Fields
The Data View palette can be used to insert fields into your form. This makes it really easy to create new fields with the proper settings and bindings. You can customize how fields are created by choosing “Palette menu button  > Options”:

- Generate Validation Scripts: If enabled, field Validate events will be generated for elements that have certain restraints defined in the schema.
- Generate Descriptive Information: If enabled, particular forms of metadata in the schema will be inserted into the field definitions in your form (more on this in another post).
- Allow Tables to be Generated: If enabled, tables, rather than plain subforms, will be generated where appropriate.
- Show Binding Properties Dialog Box: If enabled and you drag & drop an element onto an existing field, a customization dialog will be displayed (more on this later).
To insert a new field configured according to an element in the schema, just drag & drop the element from the connection tree (in the Data View palette) into your form. You can add an entire group in a single operation by dragging a container element (e.g. {customer}). When a field in your form is bound to an element in the schema, a binding icon is displayed next to the element in the connection tree.
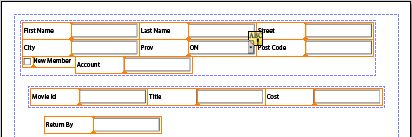
Start by dragging and dropping the {customer} element into your form. The result should be a new subform named “customer” containing 8 fields named according to the schema’s {customer} element and the elements it contains.
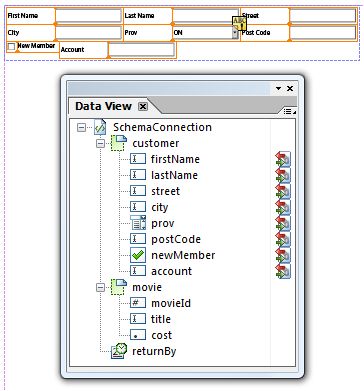
New fields on the form.
New structure in the hierarchy.
Notice how each leaf element in the connection now has a binding icon next to it in the connection tree (indicating that fields on the form are bound to those schema elements). The inserted fields were also customized according to their schema element counterparts. For example:
- All fields have appropriate data bindings (see “Object palette > Bindings tab > Data Binding property”).
- The {customer.prov} element became a drop down list which has a list of items, as well as a default value of “ON”, as specified in the schema.
- All new form objects have names that match their schema element names (though these could be altered, if better suited to any scripting requirements you may have, without affecting the data bindings).
- All new form objects have captions that are derived from their schema element names (e.g. the field bound to {customer.firstName} has a caption of “First Name”).
Next, drag and drop the {movie} element from the connection into your form.
This element is special because the schema specifies it may have multiple occurrences:
<xs:element
    name="movie"
    type="movieDef"
    minOccurs="1"
    maxOccurs="unbounded"/>
The result is a repeatable subform, as you can see by the Binding properties that were automatically set on the new “movie” subform (bound to movie[*] with Min Count set to 1 and no specified Max Count (unbounded)):

(Note that if the properties on the “Object palette > Binding tab” are partially disabled, it’s most likely because the movie subform is not inside a flowed container. Though it isn’t an XFA requirement, Designer requires it in order to enable the repeatable properties. We’ll fix this shortly.)
Binding to Existing Fields
There are two ways to bind an existing field to an element in the schema connection:
- Simply choose the element to which the field should bind by using the “Object palette > Binding tab > Data Binding property” pop-out menu (button to the right-hand side of the property) and selecting it from within the schema connection’s sub menu.
- Drag an element from the connection tree, in the Data View palette, and drop it on top of a field in your form. Doing so will — if it’s enabled — cause the Binding Properties Dialog Box to be displayed, giving you some options to further customize the existing field with information from the schema.
Binding Properties Dialog Box
Add a new text field to your form. This will be for the {returnBy} schema element. Ensure that the “Show Binding Properties Dialog Box” option is checked in the “Data View palette > Palette menu button > Options” dialog. Now drag the {returnBy} element from the connection and drop it on top of the new text field.

The above dialog will be displayed, giving you the option to update the following properties of the field on which the schema element was dropped:
- Name: Updates the name of the field to match the name of the schema element (from “TextField1” to “returnBy”).
- Caption: Updates the caption of the field to one derived from the schema (from “Text Field” to “Return By”).
- Type: Updates the field’s object type to match the kind of data represented by the schema element (from text field to date/time field).
- Type > Default Value: Updates the field’s default value to that specified in the schema, if any (in the case of {returnBy}, the schema does not specify a default value).
- Type > Data Pattern: Updates the field’s patterns (display, edit, validate, data) according to the schema (in the case of {returnBy}, no pattern restrictions are specified in the schema, though a “date{YYYY-MM-DD}” data pattern will be set by default).
Choose the “Update all related properties” option and click on the “OK” button. The text field you previously inserted will be updated to a date/time field with various properties matching the {returnBy} schema element’s specifications (as detailed above).
Finishing Touches
At this point, your form should look something like this (the positioning of the objects may differ depending on where you dropped them):
Here are a few steps you can take to make things look a little nicer (in my opinion) as well as enable instances of the movie subform to be added for new movies to rent:
- Place the movie subform in a flowed subform so that multiple instances can be added, flowed one after the other.
- Place an “add” button next to the movie subform to add instances as well as a “remove” button inside the movie subform to remove specific instances.
- Add an unbound decimal field that shows the running total cost for the movie rental order.
- Add script to the returnBy field to automatically set the date 30 days in the future.
- Add a submit button to submit the order.
Following the steps above should yield a more functional movie rental form. The only thing missing is the ability to pull-in movies to choose from. For one thing, this would avoid having to specify the movie ID, title and cost when choosing a movie to rent. To accomplish this, you could connect the form to a movie database (note that the database in the linked tutorial doesn’t have a “cost” column associated to a movie so you’ll have to add one) or, the more secure and recommended way, to a movie web service.
Minimum Requirements: I designed this form using Designer ES2 Beta and Acrobat 9.1 however the principals should work all the way back to Designer 7.1 and Acrobat 7.0.5. There may be a few features lacking from the Data View palette if you go back that far but the concept of connecting the form to a schema remains the same.
Aug 28, 2009 — Added link to Schema Metadata tutorial.
Nov 4, 2009 — Fixed a couple of syntax errors in the sample PDF form that were preventing the addition and removal of movie subform instances.
Posted by Stefan Cameron on August 3rd, 2009
Filed under Data Binding,Designer,FormCalc,Instance Manager,Tutorials,XFA
Both comments and pings are currently closed.

hello,
I am struggeling with quite a nasty problem.
I have a repeating subform that is bound to structure/ table (ROOT.DATA[*]) such as in your article. In this subform there is a checkbox that is not bound to anything!
(Normal binding works! (without scripting) as I have used a Textfild that I have bound to data called “VISIBLE”)
However, in the initialize event of checkbox I need to access the element ROOT.DATA[*].VISIBLE using the data DOM by myself.
How can I accomblish that. As the the parrent subform repeates for each ROOT.DATA, I want to read the VISIBLE element of the current subform-instance in the initialize event of the checkbox.
I have tried:
xfa.resolveNode(“$record.ROOT.DATA[*].VISIBLE”).value
xfa.resolveNode(“ROOT.DATA[*].VISIBLE”).value
this.resolveNode(“VISIBLE”).value
and a looooooooot more fancy expressions.
I guess its not much of a problem, but I would be realy grateful.
Thx
hello,
I have a repeating table row that is bound to data structure such as movie.data[*]. Within that row I have different UI elements such as checkbox, textinput, etc.
Depending on the value of movie.data[*].category I want to use just one of the UI elements.
(e.g. if category == “drama” make checkbox visible)
Therefore I want to use the initialize event of the table row and read the movie.data[*].category data.
Q: How do I access this data? I have used quite a number of statements, such as:
xfa.resolveNode(“$record.movie.data[*].category”).value
xfa.resolveNode(“category”).value
and many more, without success.
Basically I just want to have scripting access to the data of the structure my table row is bound to.
Thx a lot
Hello Stefan,
I have already posted this question in instance manager category. I haven’t seen any activity in that category since april, i am reposting the same question here again, though this topic does not belong to this section.
I have a form with 5 paragraphs. I wrapped each paragraph in a subform(sf1, sf2, sf3, sf4), also wrapped all these subforms in a flowed subform. Now, I want to hide and unhide these paragraphs based on a condition. This condition is sent through a payload XML.
Let us say, i have a sequence
1,2,3 sent in the payload XML to render the form. Based on this condition, I have to display first three paragraphs and I never had a problem to display this sequence.
Now if i have a sequence,
3,1,4.
How can i change the sequence of the paragraphs in a flowed subform?
All i know is, subforms in a flowed container are displayed in the order they are built in the hierarchy.
Can you please let me know whether my approach is correct or not? Also, can you give me a solution to change the sequence of the subforms in a flowed container.
Thanks in advance.
Sandeep,
Please see my response to your original comment on the other post.
I’m backlogged about 10 days with comments to respond to at the moment which is why I hadn’t yet responded to your first one.
Carsten M, Carsten Meyer,
You two comments seem to be asking the same basic question about this unbound data node whose value you need to get within a repeating data set.
Each form object that is bound to data has a “dataNode” property that you can use to access its underlying data node in the Data DOM. Since the checkbox isn’t bound to data but the parent (repeating) subform is, you can use an expression like this one to get the value of the VISIBLE data node inside the instance of the repeating data group node bound to the current instance of the repeating subform:
Hi Cameron–
Thanks for this informative article. My company is an Adobe Solutions Provider and I am working on a template to display data from a complicated/nested XML data source. All of the examples I’ve seen for rendering data from external XML files are 1 or two levels deep. We need to design a flexible template that can handle n levels of data.
I’ve been building my template using a sample XML file as both a preview source and data binding and have created a few fields that are bound to this source. The problem Im having is that no matter what I do I cant get more than 2 levels of data to render in my form. Is there some inherent limitation when binding data to XML instead of XSD/schema?
If you’re willing Im happy to send/post my template and data source for a future tutorial 😉
Thanks again and kind regards,
Paul
Hello again–
I just thought I’d post back and confess to user error regarding the template. My template now works as intended.
One remaining question I have–and I havent seen a tutorial about this anywhere: how do you create a dynamic template that can call subform sets programmatically instead of by xpath? As I mentioned above, our XML data can be n levels deep. To get my template working I hardwired each subform set to distinct level of nodes in the XML data and my templates can only support a depth of ten levels. Ideally we’d be able to render a subform set recursively for any node or condition in our XML.
I’d love to see a tutorial on this 😉
thx
Paul
Paul,
That’s OK, it happens to all of us. 😉
For the record, when creating a data connection based on sample XML data, you’re really creating a Schema Data Connection whereby Designer interprets the XML data and extrapolates a schema based on its structure. So creating a Schema Data Connection and one based on “sample XML data” essentially results in the same type of data connection.
By “n levels deep”, do you mean your XML may look like this:
or like this:
and you would like to have one subform (or subform set) capable of binding to the element that contains the <propertyX> nodes, regardless of its depth in the data?
If so, I’m sorry to say that I don’t believe this is possible with simple data bindings since it would imply that you are dynamically changing the binding expression on the subform/Set which is currently not allowed.
You could achieve it using script, however, by not binding the subform/Set to data and inspecting the data upon initialization (the data will be loaded in xfa.datasets.data). At this point, you can access the XML structure and “manually” create subform instances, populating instances with data as appropriate.
I know it sounds very awkward, and it is! We’re definitely thinking of ways to make this sort of thing easier in the future.