Field Background Color Fill
Did you know that you can quickly set the background fill color of a field via script using the
fillColorproperty? This can be very handy if you want to highlight a field for some reason. The property takes an RGB color value as a string: "255,0,0" would give a red fill.
What you may not realize is that fields actually have two areas: The "nominal extent" represents the entire field, including the caption, while the "content extent" represents only the data input portion of the field. There’s a difference between setting the fill color of one vs. the other.
The Nominal Extent Fill
When you set the fill color using the "fillColor" property, you’re setting the fill color of the nominal extent’s border property. It’s actually a shortcut:
TextField1.fillColor = "255,255,0"; // yellowis equivalent to this:
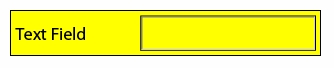
TextField1.border.fill.color.value = "255,255,0";Here’s a text field with no fill:

And here it is after setting its "fillColor" property to yellow:
(On a side note, you may notice that the field now has a border and you’re probably wondering where it came from. See this article for an explanation and what you need to do to get rid of it.)
The Content Extent Fill
So how do we set the fill color of the content extent without filling the entire field? The content extent’s fill color is specified within the field’s content extent (or "UI", in XFA terms) border and is accessed like this:
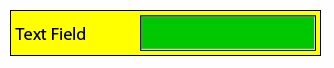
TextField1.ui.oneOfChild.border.fill.color.value = "0,200,0"; // green(If you’re wondering what the "oneOfChild" property is, see this article.)
The result of the above line of script on the initial text field is as follows:

For example, you could use the content extent fill color as a way to communicate to someone that a field is disabled (by setting its content extent fill color to light gray (230,230,230)).
Finally, you can combine the two as follows (this being the combination of setting both the nominal and content extent fill colors):
Posted by Stefan Cameron on March 14th, 2008
Filed under Scripting,Tutorials
Both comments and pings are currently closed.

This is a great tutorial, i was just trying to figure out how to do this.
Is there a way to keep the fields colored on the screen but when the document is printed via a print button, remove the coloring so it doesn’t show on the printed document?
thanks again, I’m going to implement this today, no more questions on which field to fill in. I’ve found it difficult to educate everyone to use the high light fields button.
Mark J
You can attack this is two ways (I think!):
1) Set the “relevant” property on the border to “-print” (this will keep it visible on the screen but won’t print it….essentially like the “Visible (Screen Only)” option on the object itself). Please see Stefan’s article on version specific implementations first though (http://forms.stefcameron.com/2007/09/27/presence-vs-relevance/. However, I think this will actually remove the whole border so it might look a little odd when printing.
2) You could try to reverse the script in the “prePrint” event, then execute it again in the “postPrint” event.
John.
thanks for the reply John. I have been messing around with your first idea and i cant seem to figure out how to apply the relevant “-print” to the fill color and not the object, granted I’m not the most experienced coder but I’ll continue to work on this and research using your second suggestion. I appreciate your help but if you can think of anything else i would appreciate some more input.
thanks again,
MJ
No worries Mark, try this:
yourFieldName.ui.oneOfChild.border.relevant = “-print”;
Let me know if that doesn’t work.
Mark,
Sorry, I just tried out that script and also referenced the LC Designer Reference document and it looks like a fill can’t be given a relevant property – sorry!
The script I gave earlier only removed the border’s edge (I assumed it applied to all of the border’s child objects and therefore the edge and the fill would not be printed).
John.
Thanks John,
I appreciate your efforts and time with trying to help me solve this. We will have to just live with the colors being printed until i can come up with something else but if you think of anything else i would appreciate more input. thanks again.
MJ
Reversing the script in the prePrint event will definitely work – give that a go if you still want to remove the colour.
Hi Stefan,
Is it possible to change object type for instance textfield to drop-down list at runtime?
Thank you for your help.
E. Loralon,
Unfortunately, you can’t change the object at runtime. The best you can do is show/hide the appropriate object or use the instance manager to add/remove the appropriate subform that contains the object you want to use (better for data binding).
Thank you Stefan.
Actually, I had the show/hide solution working and thought there might be a more elegant solution to accomplish the same thing.
Hi Stefan,
How do you reference the visual properties of non-interactive objects in Adobe LC Designer?
I need, for example, to fill a circle (or rectangle) in solid, linear, or radial format (with start and end colors).
BR,
Yasser
Abu Saleh,
Setting a fill on a circle or rectangle is a little tricky. In this case, the XFA object will look like this (for a circle or rectangle):
When setting a solid fill, you need to set the following XFA structure inside the <arc> or <rectangle> value type node:
(* = default)
The problem is that, initially, none of those nodes exist so you need to create them.
Here’s a sample script that sets a linear to-right fill on a circle object:
For a radial fill, you need to set the following XFA structure inside the <arc> or <rectangle> value type node:
(* = default)
The code would therefore be very similar to the example above, creating a new radial node rather than a linear node.
For the solid fill case, the XFA structure is much simpler:
Hi Stefan,
How can we set the background color of all the fields in a particular subform based on a dropdown value.
Do we need to go field by field or do we have a script to access all fields in a subform with nested subforms.
Thanks
Neha
@Neha,
Yes, you have to do it field-by-field, recursively into all containers. My Process All Fields script can help you with that.