Stefan Cameron on Forms
Building intelligent forms using Adobe LiveCycle Designer

'Events' Category Archive

New Form Design Best-Practices Blog

John Brinkman, a colleague of mine at Adobe and the LiveCycle Forms Architect no less, has decided to start a new blog on form design. It looks like he will be concentrating on on best-practices relating to form design and scripts based on past experience with forms from various customers (in other words, based on real-world forms).

Hi first post relates to exclusion group-like functionality using any type (or combination) of fields in a subform where each field is treated as a mutually-exclusive radio button. Check it out, it works very nicely!


Posted by Stefan Cameron on October 15th, 2008
Filed under Designer,Events,Scripting,Tutorials

Submitting Form Data by Email

A frequently-asked question is, "how do I modify the email in an email submit button?" Usually, the reason behind the question is that a form should either be routed to a specific person depending on data entered at runtime (so you can’t predict the data and therefore you can’t set the email submit button accordingly at design-time) or perhaps the form even presents a list of possible recipients and the user must choose which person to send the submission data to.

The Secret

The secret to changing the email recipient for an email submit button (or even changing it for a regular button which you’ve turned into a submit button using the "Object palette > Field tab > Control Type > Submit property") is to set the "target" attribute of the <submit> node that is part of the button’s Click event. The "target" specifies the URL to which the data will be submitted. HTTP and mailto are valid protocols.

In XFA, the difference between a regular button with Click event script and a submit button which submits form data when it’s clicked is that the submit button’s Click event has a <submit> node instead of a <script> node.

A regular button’s Click event:

<event activity="click">
    <script contentType="application/x-javascript">
        // your JavaScript code here...
    </script>
</event>

versus a submit button’s Click event (set to email form data in this case because of the "mailto" protocol):

<event activity="click">
    <submit format="xml" textEncoding="UTF-8" target="mailto:"/>
</event>

How is it done?

Changing the recipient is done simply by setting the submit button’s target appropriately, following the rules of the protocol you wish to use. In this case, we’ll be using the mailto protocol. Of course, we can do much more than change the recipient: We can actually specify multiple recipients, CC some others, BCC others still, specify any subject we want and even specify a customized email body (message)! All that needs to be done is to apply the mailto protocol when specifying the submit button’s target.

For example, setting the target to the following string would create an email with two recipients (one "to" and one CC’d), a subject and a body:

mailto:john@asdf.com?cc=lisa@adsf.com&subject=Re: New Account Opening&body=Thank%20you%21"

Note that the body must be URL-encoded using the "%" codes for non-URL characters such as "%20" for a space and "%21" for an exclamation mark (!). Thankfully, we can use the encodeURIComponent(string) method in JavaScript to do that part for us!

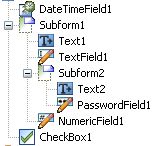
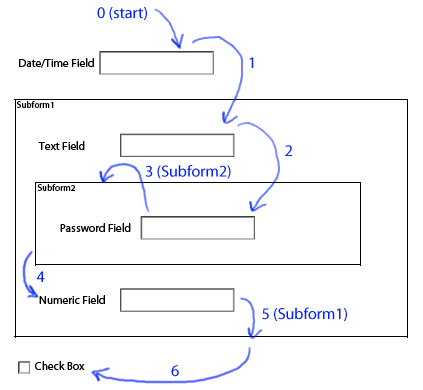
The most difficult part of all this is finding the Click event (since there could be multiple <event> nodes specified on a single field, one for each event that does something) and locating the <submit> node inside.

Sample Form

To illustrate how this is done, I’ve created a sample form that submits an address block as data and provides fields for specifying the recipient(s), CC list, BCC list, subject and body of the email.

The result of the above settings is a new email with the specified recipients, subject and body, along with the attached XML data file:


In order to accomplish this, I used the two-button submit technique where a regular button is used to set the properties on a hidden email submit button. Doing it this way also lets me easily prevent the submission if there are no recipients ("to") selected. (Note that the To, CC and BCC fields are multi-select list boxes so you can choose multiple email addresses.) You’ll be interested in the script in the "Send" button’s Click event.

Download Sample [pdf]

Minimum Requirements: Designer 8.0, Acrobat/Reader 8.0 for this form since it uses functions that are part of the new List Object API which was introduced with the 8.0 versions however you could access the selected items differently and get this to work in previous versions as well.


Posted by Stefan Cameron on August 28th, 2008
Filed under Events,Scripting,Tutorials,XFA

Form Object Order of Initialization

Here’s a quick observation you might find useful: The order in which form objects are initialized is “field and depth-first” according to the document order (the top-down order in which they appear in the Hierarchy palette in LiveCycle Designer). This means that fields inside a subform are initialized before the subform itself is initialized. When you think about it, it makes sense since this means that in a subform’s Initialize event, you always have access to properly-initialized child form objects. You can read more about event execution order in the LiveCycle Designer Scripting Basics document (page 24) as well as in the

XFA Spec (page 353 in version 2.7).

Say your form object hierarchy looked like this (in the Hierarchy palette in Designer):

Hierarchy Order

The fields and subforms would get initialized in the following order:

Order of Initialization

To clarify, this is the order (note that text objects don’t get initialized just like squares, circles and images wouldn’t — image fields would, however):

  1. DateTimeField1
  2. TextField1
  3. PasswordField1
  4. Subform2
  5. NumericField1
  6. Subform1
  7. CheckBox1

To demonstrate this, I’ve provided the form that contains the objects above. When you preview the form (or view it in your web browser) using Acrobat, use the JavaScript Console to see the output from the Initialize events of the various form objects to see the order of initialization.

Download Sample [pdf]

Minimum Requirements: I created this form in Designer 8.1.1 SP2 and tested it in Acrobat Pro 8.1.2.


Posted by Stefan Cameron on May 9th, 2008
Filed under Events,Scripting,Tutorials

What About the Other Field?

A common need in forms is to ask the user to choose between a set of options within a list, be it a radio button list, list box or drop down list. What’s more is that these lists often include an “other” option to let the user specify something more specific that isn’t included in the list. The trouble is, how do you ensure that the user fills-in the “other” field prior to submitting their form?

I thought it might be useful to provide a sample form which demonstrates how to build a list field which has an “other” option and clicking on the “other” option displays a field for entering the specific value and makes that field required — but only if the user chooses the “other” option. (You wouldn’t want the “other” field to be hidden and required or else the user would never be able to submit their form since Acrobat would prevent the submission on the premise that there’s an un-filled required field somewhere.)

“Other” Fields in Acrobat/Reader 8.1+

The first thing I did was create my sample form using Designer 8.1 and Acrobat 8.1. That was very easy and just as straight-forward as I expected it would be: One radio button list, one list box and one drop down list, each set to be required and with their own “other” item and script to show their respective “other” field (and make it mandatory) when their “other” item is selected and hide it (and make it optional) when their “other” item is de-selected. Add a submit button and Acrobat/Reader 8.1 automatically takes care of preventing the submission if any required field isn’t filled.

To keep things simple, each list field has script that detects when the user either selects the “other” item or an alternate item and sets the presence and mandatory properties of its “other” field to be visible/required or invisible/optional, respectively.

Download 8.1 sample [pdf]

Minimum requirements: Designer 8.1, Acrobat/Reader 8.1

“Other” Fields in Acrobat/Reader 8.0 or Earlier

Unfortunately, I didn’t have the same kind of experience getting this form to work in Acrobat/Reader 8.0 or earlier.

The first thing I did, since my 8.1 sample form doesn’t use any functionality only available as of Designer/Acrobat 8.1 (in fact, it uses XFA properties and script functions that have been available since Designer/Acrobat 7 and likely even earlier), I simply used Designer 8.1 to set my form’s Target Version to Acrobat/Reader 7.0.5 and figured I would open it in Acrobat 7.0.9 and all would be good. Well, that wasn’t the case.

Aside from Acrobat not respecting the “required” setting on the radio button list (which was expected since required radio button lists weren’t supported until Acrobat 8.0), I discovered a very strange behaviour in the list box where simply having a statement within its Change event that sets a field’s mandatory property to “error” will always result in that field being required, as far as Acrobat/Reader is concerned, even if the statement doesn’t appear ever to be executed on form initialization. The result is that selecting an item other than the “other” item in the list box and attempting to submit the form prompts Acrobat to cancel the submission because a required field isn’t filled. The problem is that the required field is the list box’s “other” field which is hidden from view because it isn’t supposed to be required. Finally, there was also another issue with list boxes that have Change event script: Their value is never committed to the Data DOM, which means that the list box always appears to have no value and that also prevents the user from being able to submit the form because the list box appears never to have been filled (even though an item is clearly selected).

So the are three problems with the 8.1 sample form when it’s running in versions of Acrobat/Reader prior to 8.1:

  1. Although properly supported in Acrobat/Reader 8.0, radio button lists can’t be set to “required”;
  2. List boxes with Change event script containing a statement which sets a field’s mandatory property to “error” results in that field always being “required” (this strange issue is resolved in Acrobat/Reader 8.1); and
  3. List boxes with Change event script don’t commit their value to the Data DOM (this is also resolved in Acrobat/Reader 8.1).

Fortunately, issues #2 and #3 can be resolved fairly easily simply by not using the Change event. The only viable alternative I found was using the Exit event instead. (Note that in the Exit event, you have to use the list’s “rawValue” property to determine its value rather than using the “xfa.event.newText” property as in the original Change event script.)

Issue #1 (required radio button lists not supported) can also be resolved although it requires a little more work. One alternative is to use the “Two Button Submit” Technique I described on a previous post on Complex Validations, which is what I implemented in my 7.x sample form.

Download 7.x sample [pdf]

Minimum requirements: Designer 7.0, Acrobat/Reader 7.0


Posted by Stefan Cameron on August 7th, 2007
Filed under Acrobat,Bugs,Events,Scripting,Tutorials

Setting JavaScript as the Default for New Forms

If you’ve ever written scripts in Designer, you will have noticed that the default scripting language is FormCalc which is a problem if you need to (or prefer) to write your scripts in JavaScript.

The easiest way to make sure that all your new scripts default to the JavaScript language is to use the Form Properties dialog and set JavaScript as the default scripting language (in the Defaults tab). The problem with this setting is that it affects only the current form. If you’re like me, you create lots of forms every day, you constantly forget that the default scripting language is FormCalc and you only remember once you’re running your form and you get a FormCalc error message box in Acrobat telling you that your syntax is incorrect. How annoying!

Fortunately, there’s a way to set JavaScript as the default scripting language for all new forms — based on a specific template. The default setting for the scripting language is actually specified as a processing instruction in the XML Source. If you create a new document and go to the XML Source tab, you’ll find the following processing instruction set as a child of the <template> element (also shown in the image below):

<?templateDesigner DefaultLanguage FormCalc?>

Since all new documents created in Designer are based on templates and that each template comes with its own set of processing instructions, modifying the processing instruction in the template would effectively modify the default scripting language on all new forms based on that template. Going one step further and making that modified template your default template would ensure makes things even easier when you’re creating new forms.

Fortunately, you don’t have go to the XML Source view to modify this processing instruction. Instead, you can set its value using the Form Properties dialog (accessible via the File menu): In the Defaults tab, set the Default Language property to “JavaScript”.

Modifying Designer Templates

In Designer, you use the Template Manager to organize your templates. You can access the Template Manager from the Tools menu.

To modify a template, you can follow these easy steps:

  1. Create a new document based on the template you wish to modify.
  2. Make the necessary modifications (like setting the processing instruction for the default scripting language setting to "JavaScript").
  3. Save the new document as an "Adobe LiveCycle Designer Template (*.tds)" file. If you want to replace an existing template (say "Letter"), use that same name as the file name for the new (modified) template file you’re saving.
  4. Using the Template Manager, select the tab pertaining to the group in which you want to add your new template. If you’re wanting to replace the "Letter" template, for example, select the "Standard" tab.
  5. Right-click in the list panel and select "Add Template…". Select the template you just saved and it’ll be added to Designer’s "template store". Note that if the name of your new template file is the same as an existing template in the group you selected (e.g. the "Letter" template in the "Standard" group), you’ll be prompted to overwrite the existing template.

One important thing to note in the way Designer handles templates is that any template file you add to the Template Manager gets copied into the "template store" which means that new documents based on that template aren’t actually based on the template file in the location where you saved it but rather on the copy that was placed in the "template store".

If you’re wondering what the "template store" is, it’s actually a folder inside Designer’s Application Data folder on your system. While I don’t encourage you to look in there (because you might see things that look interesting but you shouldn’t be playing with ;), if you find them, then you should also be able to open them directly in Designer and modify them without having to create a separate copy.

Updated: January 17, 2006


Posted by Stefan Cameron on January 10th, 2007
Filed under Events,Script Editor,Scripting