Stefan Cameron on Forms
Building intelligent forms using Adobe LiveCycle Designer

Home

Bug: Web service data not cleared on exception

Description

If an exception is thrown during a web service (WSDL) data connection request call (you’re executing a request to a web service in order to get a response in return), the bound data accumulated by Acrobat (for submitting the request to the web service) is not cleared from the data connection’s "request data buffer/queue" (to put it in simple terms).

For example, if your form attempts to execute a WSDL data connection while there is no active connection to the Internet, the call to the

xfa.connectionSet.WSDLConnectionName.execute

method will fail with an exception (which you can catch by placing the call within a try-catch block) however the form data accumulated to be sent as part of the request operation isn’t cleared. If you are then resetting the form by clearing repeatable subform instances that contained data at the time the data connection was executed and then re-execute the data connection, the old instance data will still be sent as part of the new request even though it’s no longer part of the form (which is clearly not what you would want/expect).

Workaround

Fortunately, you can manually clear the "request data buffer/queue", located in

xfa.datasets.connectionData.WSDLConnectionName

where "WSDLConnectionName" is the name of your WSDL data connection, simply by using the "remove" function as follows:

xfa.datasets.connectionData.WSDLConnectionName.remove();

Fix

Please refer to the Bug List for updated information on the version(s) affected by this bug as well as if and when it was/will be fixed.


Posted by Stefan Cameron on May 5th, 2007
Filed under Acrobat,Bugs

Bug: Sending WSDL request using repeatable section

Description

When executing a web service (WSDL) data connection, only the last instance of a repeatable element is included in the request.

Here’s an example of a repeatable WSDL element (the “Detail” element containing item number information):

<xsd:element name="Details">
   <xsd:complexType>
      <xsd:sequence>
         <xsd:element name="Detail" maxOccurs="unbounded">
            <xsd:complexType>
               <xsd:sequence>
                  <xsd:element name="ItemNumber" type="xsd:string"/>
               </xsd:sequence>
            </xsd:complexType>
         </xsd:element>
      </xsd:sequence>
   </xsd:complexType>
</xsd:element>

The correct behaviour is that all instances of a repeatable section are used in the request sent to the web service.

Workaround

Unfortunately, there are no workarounds for this problem however the bug will be fixed in the next release of Acrobat.

Fix

Please refer to the Bug List for updated information on the version(s) affected by this bug as well as if and when it was/will be fixed.


Posted by Stefan Cameron on May 2nd, 2007
Filed under Acrobat,Bugs

Welcome to my new blog!

Fellow Readers and Commenters,

Thank you for being patient during the migration. The process took a little longer than I anticipated and I apologize if you’ve had to wait to ask me some questions.

This new installation will hopefully provide better performance as well as cut down on the inordinate amount of spam I was getting on my old blog (with no tools at my disposal to reduce it!). You will also find that each post now has its own comment feed so it should be easier for you to keep track of the posts that interest you and get notified when I answer a question you might have posted.


Posted by Stefan Cameron on April 28th, 2007
Filed under General

Merging Text Objects

Here are two really convenient features I thought I should highlight since it can really save you time, especially if you’re cleaning-up a form after importing it as "editable objects" or "flowable layout" (which usually produces dozens, if not hundreds of small text and field).

Since Designer 7.1, there are features available to you which are capable of merging text objects with other text objects or fields.

Merge Selected Text Objects

If you select multiple text objects, you’ll get a command in the context menu and in the top-level Layout menu which reads, "Merge Selected Text Objects". If you select it, all the selected text objects will be combined into one. This is useful if you have multiple text objects each pertaining to a specific sentence which you’d like to combine into a single text object:

Before the merge:

After the merge:

Notice that all formatting is retained and that the order of the sentences depends on the original location of the various text objects with respect to each other, not the order in which they were selected.

Merge As Caption

This feature makes it really easy to set a text object as a field’s caption when that field does not have a caption. When you select a single text object along with a single field which doesn’t have a caption, you’ll get a "Merge As Caption" command in the context menu as well as in the top-level Layout menu. When you select this command, the text object will become the field’s caption, retaining all original formatting:

Before the merge:

After the merge:

As with the "Merge Selected Text Objects" feature, the placement of the resulting caption depends on the location of the text object with respect to the captionless field. Here’s an example where the text object is located below the field:

Before the merge:

After the merge:


Posted by Stefan Cameron on April 9th, 2007
Filed under Designer

Where did that border come from?

Have you ever wondered to yourself, "where did that border come from?", when you simply wanted to set a field’s fill color? I know I did for a while until I learned about how the quirkiness of borders in XFA.

For example, if I wanted to set a field’s background (fill) color to green in a button’s Click event, the first thing I would do is:

this.fillColor = "0,255,0";

or

this.border.fill.color.value = "0,255,0";

Both methods amount to the same result which is the following:

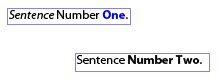
Notice the black edge that appears around the perimeter of the field. What is that doing there? All I wanted to do was set the background color to highlight the field!

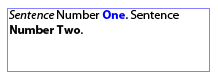
What I really wanted was this:

Is that too much to ask? All I did was set the fill color; I never messed with the edge, honestly!

In order to understand where that black edge came from and how to make it go away, we’ll need a better understanding of how borders are specified in XFA.

XFA Borders

First of all, the term "border" signifies all elements that compose the rectangular area that surrounds the entire field or the field’s value (two distinct borders). That means it’s made-up of corner, edge and fill properties, amongst others. In Designer, the field’s border is edited via the Border palette and the field value’s border is edited via the Appearance property on the Object palette’s Field tab.

Next is the fact that unlike most other XFA elements, the mere presence of the <border> element, and of some of its child elements such a <fill>, determine what the field’s border will look like. For instance, if no <border> element is specified, the field does not have a border even if the <border> element has a presence attribute with a default value of "visible". Likewise, if the <fill> element isn’t specified, the border has a transparent fill (i.e. no fill) even though it, too, has a presence attribute with a default value of "visible".

For example, the following field definition has no border:

<field></field>

If the <border> element is specified, then you also get the default <edge> element which is a thin black line and since specifying only a single <edge> element affects all sides of the border, you end-up with a black edge surrounding the border — just like in the first image above (without the green fill).

In this case, the field’s definition is simply this:

<field><border/></field>

When you use the script I proposed earlier for setting a field’s background (fill) color to green, this is what you get in the XFA syntax which describes the field:

<field>
    <border>
        <fill>
            <color value="0,255,0"/>
        </fill>
    </border>
</field>

As you can see, the <border> element has been specified and therefore the border gets the default thin black edge (even though an <edge> element wasn’t explicitly specified since an edge is implied when not explicitly specified).

Finally, edges and corners are a little tricky because there can be as little as none or as many as 4 <edge> and <corner> elements specified. What you need to remember is that they’re defined in clockwise order:

  • No <edge> element is the same as a single <edge> element which defines all edges at once (all 4 edges are identical).
  • Two <edge> elements define the top/bottom (edge 0) and left/right (edge 1) edges.
  • Three <edge> elements define the top (edge 0), left/right (edge 1) and bottom (edge 2) edges.
  • Four <edge> elements define the top (edge 0), right (edge 1), bottom (edge 2) and left (edge 3) edges.

The same goes for the <corner> element.

The Solution

So just how is it that we get rid of that edge? Well, given that the edge is implied (as mentioned earlier), all we have to do is hide it! It’s quite simple, in the end, yet quite frustrating if you don’t understand how borders work in XFA.

The <edge> element has a presence property which you can set to "hidden" in order to hide it. Therefore, the following script would set the field’s background (fill) color to green and ensure that the default black edge doesn’t appear along with it:

this.fillColor = "0,255,0";
border.edge.presence = "hidden";

That JavaScript, on a button’s Click event, will yield the border as I intended it to be (in the second image mentioned earlier).

Fun With Borders

In order to demonstrate a few things that can be done with borders using script (you may use similar scripts to show/hide borders on fields or field values for all kinds of purposes), I’ve provided this sample form. I encourage you to open it up in Designer and look at the script in order to get an idea for how you might implement your own border solution.

Download Sample [pdf]

Minimum Requirements: Designer 7.1, Acrobat 7.0.5.


Posted by Stefan Cameron on March 24th, 2007
Filed under Scripting,Tutorials