With the release of LiveCycle Designer 8.2 came many new features. Stephanie Legault, from the Designer Team, has posted two very detailed articles on some new features on the team’s blog:
Posted by Stefan Cameron on July 28th, 2008
Filed under
Designer
Since the release of Designer ES 8.2 and now LiveCycle ES Update 1, the documentation page has been updated with all sorts of goodies related to Update 1, including the following Designer-related documentation:
Posted by Stefan Cameron on July 21st, 2008
Filed under
Designer,
FormCalc,
Scripting
The scenario
You have a compliant form that has sections for users to fill-in information. Because the form is compliant (i.e. its layout has received the “stamp of approval” and cannot change without another lengthy approval process), the sections cannot grow (they cannot expand-to-fit all of the text users may fill-in). To provide more space for users to add more text, you’ve provided an expandable “overflow” section at the end of form since expanding that section will not affect the portion of the form which has been approved.
The problem
You need to capture the text entered into the form using an interactive Form Guide which is not limited to the restrictions of the form’s approved layout. As such, the Form Guide will capture the text in a single field and you need that text to be entered into the PDF version of the form. If you put all the text into the appropriate section on the form, it won’t fit and the text will be cut-off (e.g. it will not print entirely and you will miss some of the important information).
You need some way to automatically split that text between the small section in the form and the overflow section at the end of the form. In other words, you need to ensure that only the text that can fit within the small form section is placed there and the rest is placed in the overflow section at the end.
In Designer 8.2, the content of fields can now be split between pages however in this case, you can’t use this feature because the small form section can’t be expanded (it’s fixed in size).
The solution
This is the problem Stephanie, Glenn and I were faced with on a recent customer visit. Stephanie took the time to put this into a sample form which provides the script we wrote to handle this task. It’s basically a mini text parser written in JavaScript that splits text between two fields with a fixed-width font (e.g. Courier New, Lucida Console, etc.).
Posted by Stefan Cameron on July 10th, 2008
Filed under
Acrobat,
Designer,
Form Guides,
Scripting,
Tutorials
You can now purchase Acrobat 9 Standard, Pro and Pro Extended. You can also download Reader 9.0. An updated version of Designer (8.2) is included with the Pro and Pro Extended versions.
I’ve been using Designer 8.2 for quite some time now (working at Adobe does have its perks!) and I must say it’s much more stable than 8.1 and has a lot of really nice, new features to offer such as:
- major tab ordering UI update — we listened to your feedback and made this a whole lot better than it ever was before;
- hyperlink support;
- advanced text formatting with kerning, horizontal/vertical stretch, hyphenation, etc;
- enhancements to the Fragment Library (you can now edit Fragment Info metadata without having to open the fragment and you can also delete fragments right from the Fragment Library);
- contents of fields (text fields, numeric fields, etc.) and text objects can now be split across pages for a nicer layout;
- authenticated web service support.
Those are only the highlights. There are many other little but very significant updates that I’ll be sharing in future blog posts so stay tuned and in the mean time, get the free trial and check it out!
Acrobat/Reader 9.0 also has a host of new features including:
- native support for Flash (you can now embedded SWFs directly into your PDF documents);
- assemble various files together into a cohesive, branded package called a PDF Portfolio;
- and many more features that will enhance productivity and collaboration.
As usual, there are enhancements to XFA-PDF forms in Acrobat/Reader and I’ll be highlighting a few of those as well in future posts.
PS: Note that the standalone version of Designer has not been updated yet. I suspect it’ll be updated very soon however at this time, it looks like the only way to get Designer 8.2 is by downloading/purchasing Acrobat 9.0 Pro/Extended.
Posted by Stefan Cameron on July 3rd, 2008
Filed under
Acrobat,
Designer
Have you ever wanted to shade (color) a field’s caption instead of its content area? For example, you may want

instead of (entire field shaded)

or (field’s content area shaded)

Shading the entire field is easy: just set the background fill color using the Border palette. Shading the field’s content area is easy too: just choose “Object palette > Field tab > Appearance > Custom…” and set the background color in the Custom Appearance dialog that appears. Shading the caption, that’s not so trivial, unfortunately.
There are actually six (six!) steps involved in shading a field’s caption if you want the end-result to be a field that has a shaded caption but retains all of the original spacing (i.e. margins) of the caption’s text and the field’s value (don’t worry, it only seems long because I explain the logic of the steps along the way):
- Set the field’s background color to blue (or whatever color you want the caption to be): “Border palette > Background Fill > Style > Solid” and use the color well to choose the color you want.
- Set the field’s content area background color to white (the “paper”/document color): “Object palette > Field tab > Appearance > Custom… > Background Fill > Style > Solid” and use the color well to set the color to white.
- Remove all field margins but remember what they were — we’ll need them in the following steps (this gets rid of the color you see above, below and to the right of the field’s content area): “Layout palette > Margins” and set all of them to zero.
- Set the field caption’s indentation and spacing paragraph formatting properties to the original margins: “Paragraph palette > Edit Caption Properties” using the edit menu as follows:
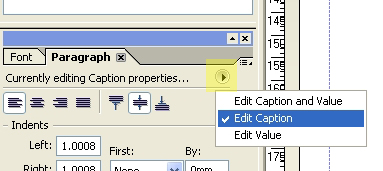
This will ensure that you’re only modifying the caption’s paragraph formatting properties (the default is set to modifying both the caption and value, or “content area”, at the same time). The set the “Indents > Left”, “Indents > Right”, “Spacing > Above” and “Spacing Below” to the original left, right, top and bottom margins, respectively. This will give the illusion of margins around the caption without actually setting the margins so that the field’s background color we set in step 1 won’t be visible around the field’s content area.
- Set the field’s content area (value) indentation and spacing paragraph formatting properties to the original margins except for the left spacing otherwise the spacing between the caption and content area (value) will be doubled because we’ve already set the caption’s right spacing to the original right margin: “Paragraph palette > Edit Value Properties” using the edit menu as above. The set the “Indents > Right”, “Spacing > Above” and “Spacing > Below” to the original right, top and bottom margins, respectively. Ensure that “Indents > Left” is set to zero. This will give the content area the illusion of having margins without actually setting margins on the field. (Note that this may conflict with paragraph formatting you may want on a multi-lined text field, for example. If that’s the case, you simply may not be able to give the effect of the original margins on the content area.)
- Add the original left margin value to the field caption’s reserve (the space reserved within the field’s “box” for displaying the caption): “Layout palette > Caption > Reserve” and add the left margin value to the value currently set in the Reserve property. This will move the content area back to its original horizontal position prior to removing the margins.
So there you have it: a shaded caption! Now that you’ve done these steps, all you need to do to change the shade is change the field’s background color (like in step 1).
Remember that you can always store a field you’ve formatted this way as a custom object in the Object Library so that you can easily re-use it again in other forms without having to go through these steps again.
To illustrate this a little better, I’ve included a sample form that shows the various ways to shade a field:
Download Sample [pdf]
Minimum Requirements: I created this form using Designer 8.1.1 SP2 and Acrobat 8.1.2 however this technique should work at least back to Designer 7.1 and Acrobat 7.0.5.
Posted by Stefan Cameron on June 13th, 2008
Filed under
Designer,
Tutorials
