Stefan Cameron on Forms
Building intelligent forms using Adobe LiveCycle Designer

Archive for September, 2006

FormCalc Expressions (If and For)

In Designer, you can write scripts using one of two languages: FormCalc and JavaScript. If you’re like me, you’re more familiar with JavaScript because it’s very similar to Java and JScript syntax but when it comes to FormCalc, you’re lost. Well, not completely but you find it very difficult to find documentation on the syntax for loops (like While, For, etc.) which are sometimes essential. Maybe you fall-back on JavaScript in those times but, on average, FormCalc scripts execute much faster than JavaScript scripts so why not harness that performance in our forms?

In this post, I’ll explain the syntax of the If and For expressions in FormCalc. Those of you familiar with Visual Basic or VBScript will likely find this more familiar than the equivalent JavaScript syntax (while I’ll include for comparison however this isn’t a post on JavaScript syntax). In future posts, I’ll add to this collection by discussing the syntax for While and ForEach loops.

Conventions

Before we get started, I should explain a few things about the various syntax blocks you’ll find further down in this post (note that this is simplified for the purposes of this article):

  • SimpleExpression: A simple expression like a comparison “i >= 0” that evaluates to true or false or a single entity like “MyVar” (a defined variable) or “5” (a number), for example.
  • ExpressionList: A set of 1 or more expressions, each on a separate line.
  • Square Brackets: A series of keywords (like “if”, “then”, “for”, “while”, etc.), SimpleExpressions and ExpressionLists grouped within square brackets denote an optional part of the syntax.
  • Asterisk Character: Sometimes a closing square bracket is followed by an asterisk (*). This indicates that the optional syntax may be used 0 or more times.
  • Question Mark Character: Sometimes a closing square bracket is followed by a question mark (?). This indicates that the optional syntax must be used 1 or more times.

Variables

I assume you’re probably familiar with declaring variables in scripts but just in case, in FormCalc, you declare variables like this:

var MyVar

and you can even declare it and assign it a value in the same step:

var MyVar = 5

If Expression

Let’s look at one of the most essential of all expressions:

FormCalc Syntax

if ( SimpleExpression ) then
    ExpressionList
[ elseif ( SimpleExpression ) then
    ExpressionList]*
[ else
    ExpressionList]?
endif

Based on the syntax, you can do things like (assuming you’ve declared a variable named “i”):

if (i >= 10) then
  i = i + 10
endif

or

if (i >= 10) then
  i = i + 10
elseif (i >= 5) then
  i = i + 5
  i = i * 2
else
  i = i + 1
endif

Hopefully this illustrates the differences in the syntax indicated by the asterisk and question mark characters.

JavaScript Syntax

For comparison, let’s look at the equivalent JavaScript syntax for the two examples above (note the semicolons and curly braces):

if (i >= 10)
  i = i + 10;

or

if (i >= 10)
  i = i + 10;
else if (i >= 5)
{
  i = i + 5;
  i = i * 2;
}
else
  i = i + 1;

For Expression

Often times, in your scripts, you need to execute some statements a certain number of times or iterate through a collection. In those cases (and many others), a For loop may be useful.

FormCalc Syntax

for Variable = StartExpression
        (upto | downto) EndExpression
            [step StepExpression]?
        do
    ExpressionList
endfor

In this syntax, there’s a StartExpression, and EndEExpression and a StepExpression. These are all similar to SimpleExpressions as described earlier. One thing to note about For loops in FormCalc is that “upto” loop will iterate as long as Variable is less-than-or-equal-to (<=) EndExpression whereas a “downto” loop will keep iterating as long as Variable is greater-than-or-equal-to (>=) EndExpression. Also, the variable Variable is implicitely declared in the For expression.

Based on the syntax, you can do things like add the numbers 1 to 10, inclusively, to a list:

for i = 1 upto 10 do
  MyList.addItem(i)
endfor

and then

var nCount = MyList.#items[0].nodes.length

if (nCount >= 2) then
  for nItem = nCount downto 1 step 2 do
    xfa.host.messageBox( MyList.#items[0].nodes.item(nItem - 1) )
  endfor
endif

which would display the value of each even-numbered list item in reverse sequence using a message box as long as there’s at least one even-numbered list item to display.

JavaScript Syntax

For comparison, here are the equivalent JavaScript examples (note the semicolons and curly braces again):

for (var i = 1; i <= 10; i++)
{
  MyList.addItem(i);
}

(in this case, the curly braces are optional but I think this is better style) and then

var nCount = MyList.resolveNode("#items[0]").nodes.length;

if (nCount >= 2)
{
  for (var nItem = nCount; nItem >= 1; nItem - 2)
  {
    xfa.host.messageBox(
      MyList.resolveNode("#items[0]").nodes.item(nItem - 1) );
  }
}

Posted by Stefan Cameron on September 14th, 2006
Filed under FormCalc
Not Just Flash, Flex and Dreamweaver!

Have you seen Mike Potter’s LiveCycle @ MAX Google Calendar ? It’s a great way to see all the LiveCycle -related sessions being offered at the Adobe MAX 2006 conference this year.

I think many people still think or expect that MAX is still all about the former Macromedia products such as Flash, Flex and Dreamweaver. While there’s still lots of focus on those really cool applications, Adobe has added a whole slew of sessions on LiveCycle products such as Designer, Workflow, Forms and even a preview of what we’ve got in store for LiveCycle 8!


Posted by Stefan Cameron on September 11th, 2006
Filed under Conferences,MAX 2006

Bug: "Page n of m" Custom Object Broken in Tables

Description

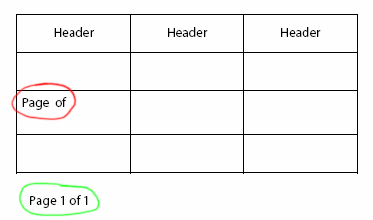
If you use the “Page n of m” object from the Library palette’s Custom tab, you may have noticed a bug when you drag that object from the Library directly into a table cell:

Canvas.gif

In the image above, the “Page n of m” object circled in green is correct whereas the one circled in red is not.

If you preview the form or run it in stand-alone Acrobat, you’ll get something like this:

Preview.gif

You can see, in the image above, that the green-circled object is showing the correct page information while the red-circled one isn’t showing any information at all. That’s because the text object from red-circled “Page n of m” object contains broken references to the Floating Fields which are used to display the current page and page count information.

Workaround

The “Page n of m” is a special object that’s actually made-up of 3 separate fields:

  • A hidden floating numeric field named “CurrentPage” which displays the current page’s number.
  • A hidden floating numeric field named “PageCount” which displays the total number of pages.
  • A text object which references both the CurrentPage and PageCount fields and has the text “Page # of ##”.

Hierarchy.gif

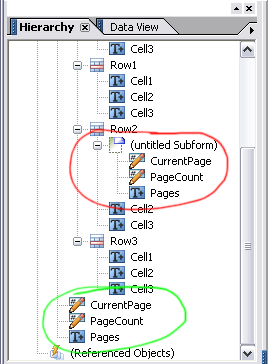
The image above shows how the red- and green-circled objects in the first image are represented in the Hierarchy palette which clearly shows that each “Page n of m” object is a hybrid object made-up of 3 separate objects.

The “Page n of m” works by using what Designer calls Floating Fields where a field (such as CurrentPage) is referenced by another object’s text. In theory, that would mean that you should be able to place floating fields in captions as well as in text objects however Designer only supports them in text objects.

If you use the XML Source tab to look at the source for the green-circled object, you’ll see how this is done (please note that I’ve abbreviated it here for clarity):

<field name="CurrentPage" presence="hidden" access="readOnly"
      id="floatingField011478"/>
<field name="PageCount" presence="hidden" access="readOnly"
      id="floatingField029358"/>
<draw name="Pages">
  <ui><textEdit/></ui>
  <value>
    <exData>
      <body>
        <p>
          Page <span xfa:embed="#floatingField011478"/> of
          <span xfa:embed="#floatingField029358"/>
        </p>
      </body>
    </exData>
  </value>
</draw>

In the above XML source, you can see that the text object (named “Pages”) has valid references to the CurrentPage and PageCount fields because its “xfa:embed” tags use their pertaining IDs.

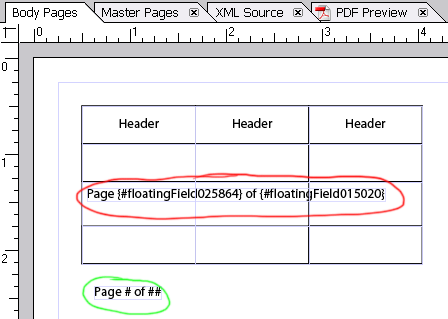
If we now look at the XML source for the red-circled (broken) “Page n of m” object, it’s clear that the text object’s references to the CurrentPage and PageCount fields are broken since the IDs used by the Page text object don’t match those assigned to the CurrentPage and PageCount hidden Floating Fields:

<subform>
  <field name="CurrentPage" presence="hidden" access="readOnly"
      id="floatingField025864_copy1_copy1_copy1"/>
  <field name="PageCount" presence="hidden" access="readOnly"
      id="floatingField015020_copy1_copy1_copy1"/>
  <draw name="Pages">
    <ui><textEdit/></ui>
    <value>
      <exData>
        <body>
          <p>
            Page <span xfa:embed="floatingField025864"/> of
            <span xfa:embed="floatingField015020"/>
          </p>
        </body>
      </exData>
    </value>
  </draw>
</subform>

This can be easily fixed by modifying the IDs of the CurrentPage and PageCount fields to be the ones that the Page text object is expecting them to be: floatingField025864 and floatingField015020, respectively. Once you’ve fixed the IDs, previewing the form should give you something like:

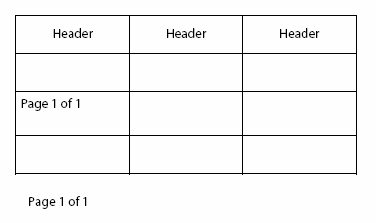
FixedPreview.gif

You can see now that the once-broken “Page n of m” object in the table cell is functioning properly.

Fix

Please refer to the Bug List for updated information on the version(s) affected by this bug as well as if and when it was/will be fixed.


Posted by Stefan Cameron on September 6th, 2006
Filed under Bugs,Designer

Making a Table of Contents

One of the hottest topics on the Designer Forums these days seems to be methods by which one can add a table of contents to their form. Since there are many different ways to achieve this, I thought I would post a little sample to demonstrate how this can be done.

Of primary concern when adding a table of contents to your form is ensuring that the links provided to the form’s various pages/sections remain valid at all times. Static forms whose page set never changes don’t really need to worry about this but dynamic forms do. That is, regardless of whether content pages are added, re-ordered or even deleted from your dynamic form, you need to ensure that when a TOC link is clicked, the user is taken to the correct page pertaining to the topic they selected.

The best way of ensuring that TOC links don’t get broken as a result of changes to the form’s pages is by using layout information provided by the XFA Layout Model. This model provides information such as an object’s actual dimensions (width/height), the page on which it is located as well as a few other interesting pieces of information.

By using the

xfa.layout.absPage

we’re able to get the page number on which an object is currently located, taking into account the various pages which may have been inserted or removed in-between the TOC page and the page in question. Taking that page number and assigning it to the

xfa.host.currentPage

property then sets the current page to the one on which is located the object in quetsion.

Download Sample [pdf]

Minimum Requirements: Designer 7.x, Acrobat 7.x.

page or absPage?

If you’re looking at the Adobe XML Form Object Model Reference (page 188), you’ll notice that there are actually two methods which provide the number of the page on which an object is currently located:

xfa.layout.page // returns a 1-based number

and

xfa.layout.absPage // returns a 0-based number

Since we need to set that information to the

xfa.host.currentPage

property and that it expects a zero-based page number, it’s simpler to use the absPage version.

The Layout:Ready Event

When using the XFA Layout Model, it’s very important to realize that the information it contains is constantly updated whenever something on your form changes that may affect an object’s positional data. Therefore, you must ensure that the form’s layout has been updated before you attempt to obtain information from it about a particular object.

For TOC page fields that display the page number on which a topic is currently located, it’s easier to simply put script in the Layout:Ready event of that field since this event is fired every time the form’s layout process is complete. Therefore, whenever pages get added, re-ordered or even removed, this event is fired and the fields are updated with the most current information.

Alternatively, if you’re writing script in another event and you need to know whether information in the XFA Layout Model is up-to-date, you can use the

xfa.layout.ready

boolean property which returns true if the form’s layout process is complete and false otherwise.

Links in XFA

A lot of customers have asked me how to create links in XFA. The concept of links is essential to a TOC page since it’s sole purpose is to provide links to various pages within a document.

Unfortunately, XFA 2.4 (used by Designer 7.1+ and Acrobat 7.0.5+) doesn’t have the ability to describe the equivalent of an HTML anchor (link) or a PDF Bookmark. Therefore, we’re forced to cheat a little. One way of doing that is by using a transparent button overlaid on top of another object (text or field) which displays information about a link. You could also use a button directly by using its caption to describe what it links to but you’ll most likely run into text alignment problems if you need the button’s caption to be anything but centered.

My sample uses the former solution and places transparent buttons over the fields which display information about the link (title and current page number). You can make a button transparent by removing its caption text and customizing its Appearance property (on the Object palette’s Field tab) to remove its borders and fill.

Finally, the z-order (or top-down order in the Hierarchy palette) of the transparent buttons used as links with respect to the fields over which they’re to be located is very important in that the buttons must be above (higher in z-order or lower in the Hierarchy palette) the fields to which they pertain. One way to do this is by selecting a button and choosing the “Layout | Bring to Front” menu item. This will ensure that when you click on the topic, you’ll click on the link button rather than the field which describes the topic.


Posted by Stefan Cameron on September 4th, 2006
Filed under Scripting,Tutorials